| View previous topic :: View next topic |
| Author |
Message |
ideola

Joined: 01 Oct 2004
Posts: 15550
Location: Spring Lake MI
|
 Posted: Thu Mar 15, 2012 7:41 am Post subject: How to mount a 924S/944 rad + shroud in an early 924 Posted: Thu Mar 15, 2012 7:41 am Post subject: How to mount a 924S/944 rad + shroud in an early 924 |
 |
|
The 924S/944 radiator is a little bit larger and a little bit lighter than the original radiator, so it should be good for providing some additional cooling, especially on a 931. The dual fan shroud is also much lighter and slimmer, and has six-bladed fans which produce better airflow than the original fan arrangement.
The challenge with the later rad is that it has mounting points on the engine side of the rad, which is exactly opposite what the early rad has. The good news is that the mounting holes are pretty-much a spot on match for the geometry of the original unit, so fabricating some brackets is actually quite an easy task. The wiring harness connects right up too (well, the one from my ROW 1981 931 did anyway...not sure about the earlier cars...).
Supplies:
- four rubber grommets from your original radiator
- four sleeve spacers from your original radiator
- eight large flat washers from your original radiator
- a small selection of additional washers for M6 bolts
- four M6x35 (or so) bolts
- six hex-head 10mm machine screws
- ~18" of 1/8" thick x 1" wide steel or aluminum stock (I used a piece of galvanized steel)
Tools:
- hacksaw or sawzall (for cutting bracket stock)
- bench vise
- bench grinder
- hand drill or drill press (preferable)
- various drill bits
- BFH
Here is a photo of the OEM grommet arrangement that I re-used from my early radiator mounting:

Here's a side by side comparison of the two arrangements. 924S rad on top, early single fan rad (which was standard on non-AC cars) on bottom:

_________________
erstwhile owner of just about every 924 variant ever made
Last edited by ideola on Thu Mar 15, 2012 8:42 am; edited 1 time in total |
|
| Back to top |
|
 |
ideola
Joined: 01 Oct 2004
Posts: 15550
Location: Spring Lake MI
|
| Posted: Thu Mar 15, 2012 7:50 am Post subject: |
|
|
Now to make some brackets.
Cut FOUR pieces of your flat stock into 4.5" lengths. Make a scribe mark at 1" from either end. This is where we will eventually be making some bends.

Using your bench grinder, round off the inner corners on ONE end of each bracket to match the contour of the 924S/944 fan shroud.
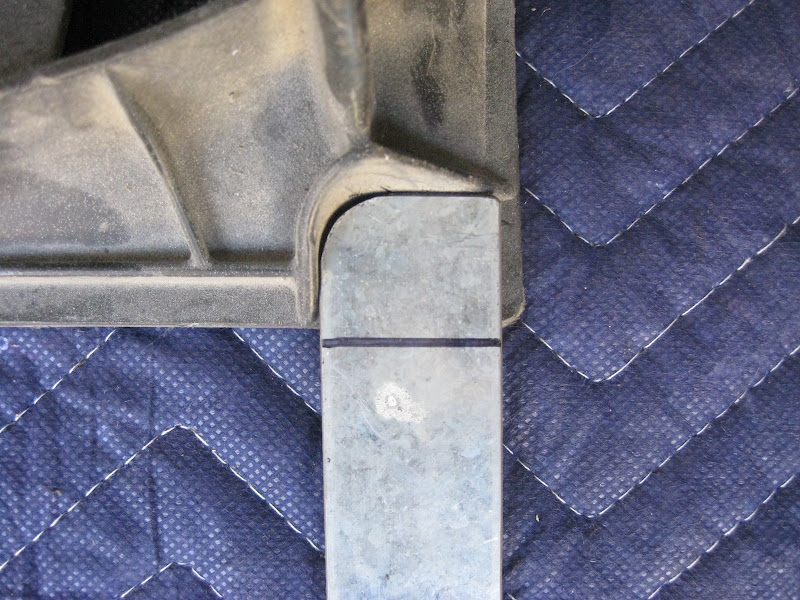
Flip the shroud over, hold each bracket up to its respective mounting point, and use a market to notate where the mounting hole should be drilled.
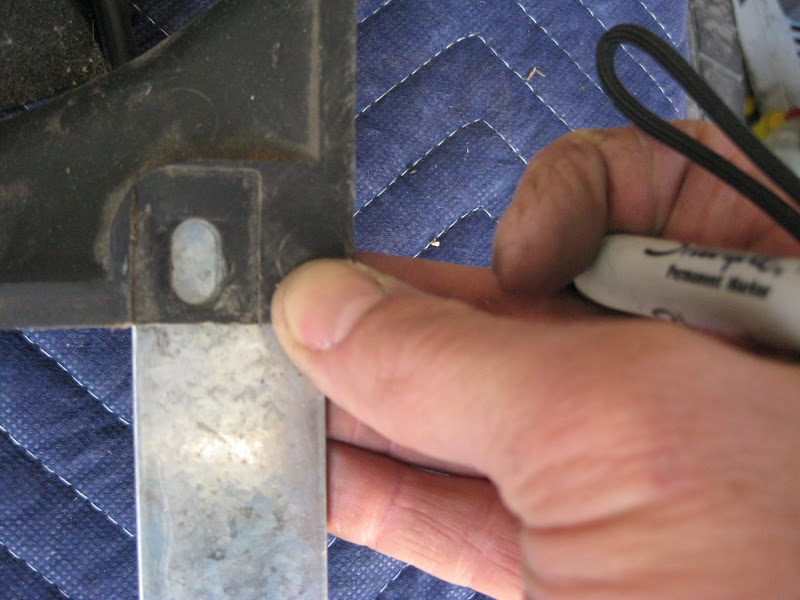


Drill the small mounting hole for the radiator mount. On the opposite end, in roughly the center of the 1" square denoted by the scribe mark you made, drill a large hole about 3/4" in diameter.
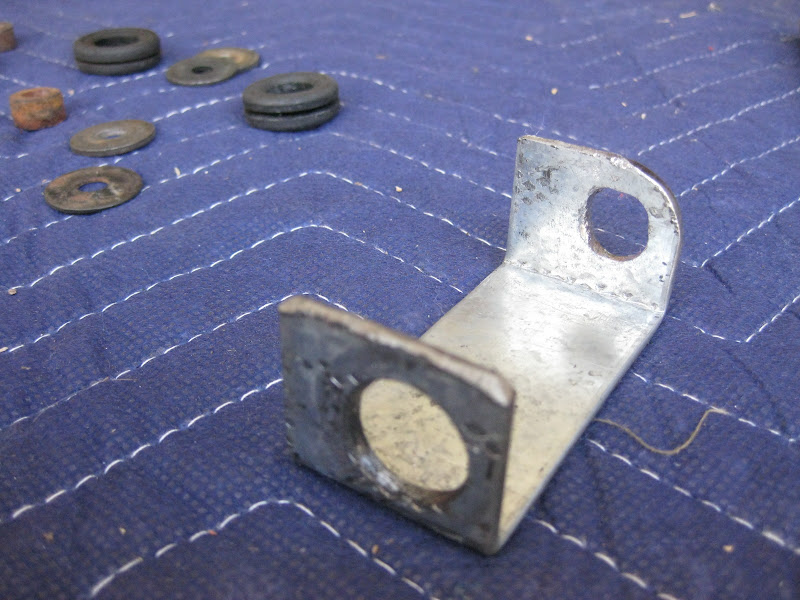
Take two pieces for making the bottom brackets, and use your bench vice and a BFH to bend the bracket along the scribe marks to make a U-shape. Be careful not to make the bend too close to the large hole, or you will have difficulty fitting the grommet.
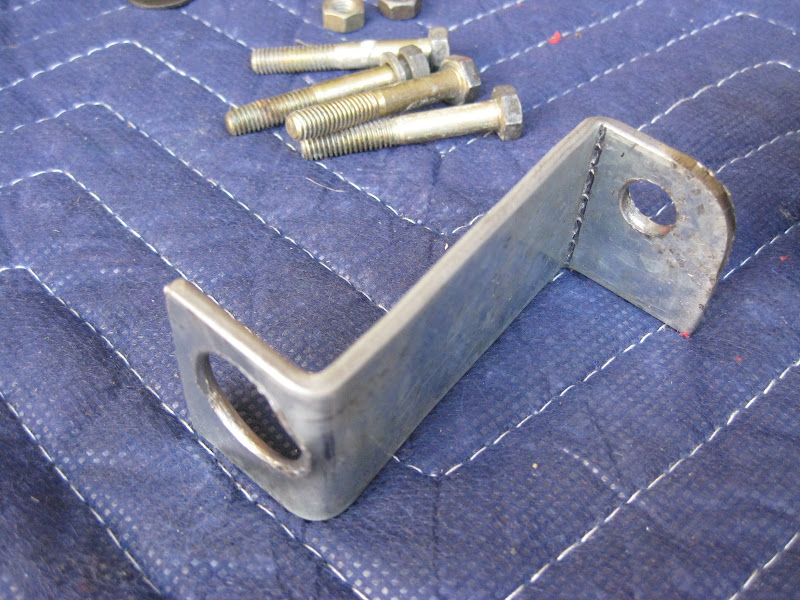
Take the other two pieces for making the top brackets, and use your bench vice and a BFH to bend the bracket along the scribe marks to make a Z-shape. In the photo below, you can see I made the bend a little too close to the big hole. Not a show-stopper, but now I know better.
Paint the bracket, if desired, and fit the grommet and spacer sleeve.

_________________
erstwhile owner of just about every 924 variant ever made |
|
| Back to top |
|
|
ideola
Joined: 01 Oct 2004
Posts: 15550
Location: Spring Lake MI
|
| Posted: Thu Mar 15, 2012 8:00 am Post subject: |
|
|
Now mount the brackets onto the radiator + shroud assembly.
The 924S mounting points, as mentioned above, are on the engine-side. There are six speed-nuts affixed to the radiator housing to which the fan shroud mounts. Since I didn't have the original 924S hardware, I had to improvise. As it turns out, the machine screws used to hold the fenders on are just about perfect. They are a touch long, but this is easily addressed by shimming with an extra washer or two. Get six of these screws (or something similar). For now, only use TWO of them to mount the shroud to the radiator in the CENTER mounts only (upper & lower). Now turn the assembly over.
For the bottom brackets, take one of your M10x35 (or so) bolts, put one of the big flat washer on it, then pass it through the grommet. Put another one of the big flat washers on the other side; then find another suitably large flat washer (not one of the original 8 that came from your rad) and a nut on to hold the grommet and washer in place until you install the rad in a few moments. Use two of your four remaining machine screws to fasten the lower brackets to the 924S rad's stock mounting point (i.e. the speed nut).


Now attach the top two brackets using the remaining machine screws.


_________________
erstwhile owner of just about every 924 variant ever made |
|
| Back to top |
|
|
ideola
Joined: 01 Oct 2004
Posts: 15550
Location: Spring Lake MI
|
| Posted: Thu Mar 15, 2012 8:39 am Post subject: |
|
|
Now installing the radiator is easy. I used a short piece of 1x lumber on my jack pad to ease the rad into position. I attached the two lower bolts first, using a large flat washer on the front side, and then hand-tightened the nut. Then used the jack to slightly lift and hold the rad high enough to push the second set of M10x35 (or so) bolts with flat washers on either side of the grommet into the captive nuts that serve as the OEM mounting points on the front cross member.
Upper LHS mount:

Upper RHS mount:
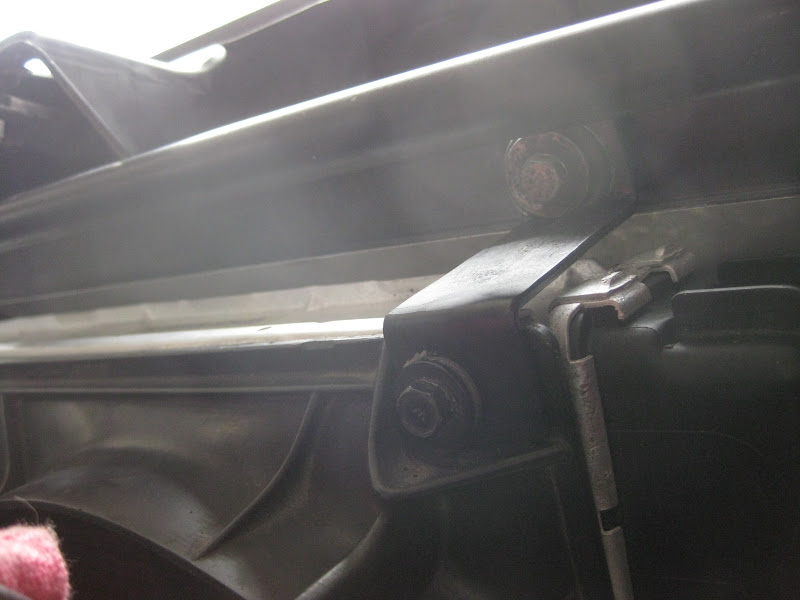
Lower LHS mount:

Lower RHS mount:

Top view. Looks bone stock!
One last glamor shot:

The next step is to document the hose installation, which I hope to get around to tonight.
_________________
erstwhile owner of just about every 924 variant ever made |
|
| Back to top |
|
|
mikebola

Joined: 07 Sep 2009
Posts: 361
Location: Parkside, PA
|
| Posted: Thu Mar 15, 2012 8:41 am Post subject: |
|
|
this is an excellent write-up. thank you!
_________________
proud owner of a 1979 924 Sebring Edition with a 931 trans that looks horrible but somehow runs... |
|
| Back to top |
|
|
tyfighter123

Joined: 19 Jan 2010
Posts: 551
Location: Colorado
|
| Posted: Thu Mar 15, 2012 8:54 am Post subject: |
|
|
Dan love the write up! Now just to do one for every other part of your build.......... 
_________________
Porsche 924 1977 N/A
Mustang GT/CS 2007
Porsche 924S 1987 (parts car)(cut up and recycled)
Porsche 911S 1976
Porsche 931 1980
Porsche 931 1980 (parts car) |
|
| Back to top |
|
|
Rasta Monsta

Joined: 12 Jul 2006
Posts: 11733
Location: PacNW
|
| Posted: Thu Mar 15, 2012 12:43 pm Post subject: |
|
|
Looking forward to hearing more about that monster assed alternator.
_________________
Toofah King Bad
- WeiBe (1987 924S 2.5t) - 931 S3
|
|
| Back to top |
|
|
ideola
Joined: 01 Oct 2004
Posts: 15550
Location: Spring Lake MI
|
| Posted: Thu Mar 15, 2012 2:08 pm Post subject: |
|
|
| Rasta Monsta wrote: | | Looking forward to hearing more about that monster assed alternator. |
From this thread:
| ideola wrote: | Here are some details from the spec sheet on my 150A replacement alt:
Max alternator output: 190A
Max output power: 2437W
Voltage set point: 14.5
Leakage current: 0.42
Ripple current: 42
Alternator turn on speed: 1531 RPM
Regulator activation speed: 1419 RPM
Output current table (tested at 12.8V):
1600 RPM: 72A
1800 RPM: 96A
2000 RPM: 116A
2400 RPM: 143A
3500 RPM: 169A
5000 RPM: 183A
6000 RPM: 190A
Terminals / Application: Universal J plug with 5 wires. Field is protected by "in-line" fuse. The alternator has an internal voltage regulator, as well as an internal fan and an integral shield on the back. |
| ideola wrote: | Click for high resolution images.
 
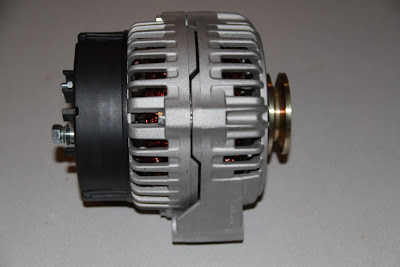 
 
Last two images are as-installed on the new 941 motor with all stock mounting hardware and stock 931 belt. |
I have one in the 941 and now in the Club Sport. The Club Sport also has the HiTorque starter, a new starter harness made by the guy who bought the rights to do the Ice Shark kits, and will very soon have a new ground kit to match. I don't anticipate having electrics issues on this car.
I had to make my own bushings for the mounting ears. They have holes to accommodate M10 bolts, which is too large for our M8 alternator hardware. So I bought a 3' section of 3/8" copper tube at the hardware store and used a tube cutter to make my own bushings for the mounting ears. Other than that, this unit is direct bolt-in. I haven't tried it yet for the NA, but seeing as how the NA and 931 use the same unit, I would be surprised if it didn't work.
_________________
erstwhile owner of just about every 924 variant ever made |
|
| Back to top |
|
|
ideola
Joined: 01 Oct 2004
Posts: 15550
Location: Spring Lake MI
|
| Posted: Fri Mar 16, 2012 12:31 am Post subject: |
|
|
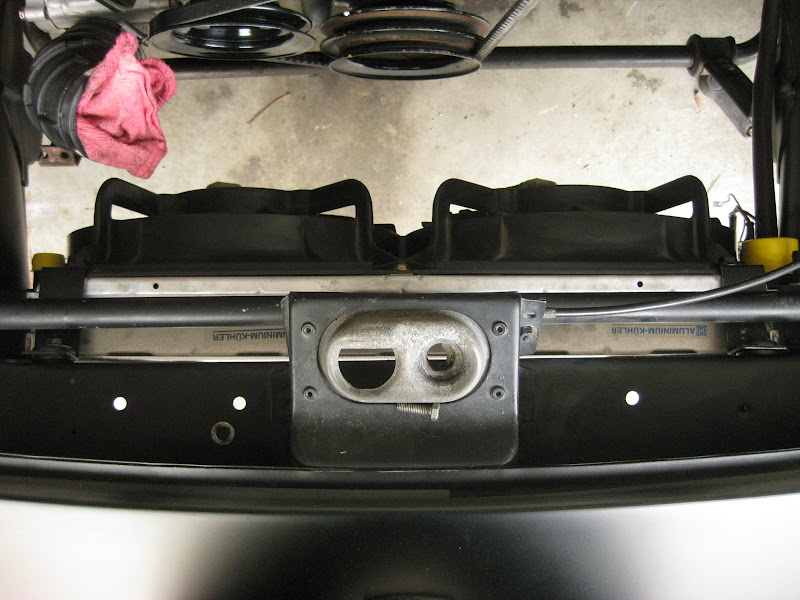
Now for mounting the hoses. It's not a huge deal, but the biggest issue to overcome is that the 924S/944 rad has larger ports for the primary upper and lower hoses. Things are also greatly eased by swapping in a 944-style expansion tank, and there is really no reason not to regardless of whether you're doing a 924 NA or 931. One of the biggest advantages IMO is the ability use standard off-the-shelf pressure caps. Speaking of which, the pressure cap is an oft-overlooked element of refurbing the cooling system...the springs will wear out and they won't maintain enough pressure to prevent the coolant from boiling. So spend a few $$ and get a new cap.
The 944 expansion tank mounts directly onto the LHS fender rail behind the headlight. In order to install one onto the 931, you have to remove or modify the bracket that holds the 931 expansion tank...very easy to do using a hacksaw or sawzall. You can see how I modified mine in this photo...it helps to keep the base portion of the bracket in order to support the OEM air-oil separator bracket:

_________________
erstwhile owner of just about every 924 variant ever made
Last edited by ideola on Fri Mar 16, 2012 12:53 am; edited 1 time in total |
|
| Back to top |
|
|
ideola
Joined: 01 Oct 2004
Posts: 15550
Location: Spring Lake MI
|
| Posted: Fri Mar 16, 2012 12:52 am Post subject: |
|
|
Once you have the expansion tank installed, you can start on the hoses. Here's the list of what you'll need:
QTY 2: 046.121.061 (yes TWO; lower rad hose)
QTY 1: 944.106.245.04 (expansion tank to rad)
QTY 1: 944.106.249.01 (expansion tank to rad overflow fitting)
QTY 1: 944.106.251.00 (expansion tank overflow hose)
QTY 1: 931.106.159.00 (t-stat housing to upper water pipe)
Unfortunately, this last hose is NLA and I have not found a suitable replacement, although I'm working on it. I simply re-used one of the several I have salvaged from various projects that was in good enough condition.
The first problem is to get the stock 931 hose installed. As mentioned above, the ports on the later rad are larger than on the original 924 rad. I just used a bunch of assembly lube on the inside of the stock lower rad hose and the outlet from the rad. I used a tiny screwdriver to gently persuade the smaller hose opening to stretch and fit onto the outlet. Here it is installed:

The second problem is that the stock upper rad hose (931.106.157.00) that goes from the hard water pipe to the upper inlet is also too small. Rather than fight with it, I just used a second lower rad hose. It has the perfect 90 degree bend, and the larger opening that ordinarily would connect to the lower water pump inlet is perfect for the upper rad inlet. Here's it is installed:

Install the t-stat-to-hard-pipe 90 degree elbow (the one that is NLA) as normal.
Install the expansion-tank-to-lower-rad hose, the long squiggly 944 part number. Here it is installed:
 
Install the two smaller overflow hoses as normal. Done!
_________________
erstwhile owner of just about every 924 variant ever made |
|
| Back to top |
|
|
Rasta Monsta
Joined: 12 Jul 2006
Posts: 11733
Location: PacNW
|
| Posted: Fri Mar 16, 2012 1:19 am Post subject: |
|
|
| ideola wrote: | Install the expansion-tank-to-lower-rad hose, the long squiggly 944 part number. Here it is installed:
|
See that threaded hole? On the 2.5, there is a strap bolted there to keep the hose from moving around. I might also suggested getting it out from under the hood release cable to keep it from abrading. Also, you probably recall that the hose is loosely ziptied to the header panel, also to keep it from abrading.
_________________
Toofah King Bad
- WeiBe (1987 924S 2.5t) - 931 S3
|
|
| Back to top |
|
|
ideola
Joined: 01 Oct 2004
Posts: 15550
Location: Spring Lake MI
|
| Posted: Fri Mar 16, 2012 1:38 am Post subject: |
|
|
Good points, will do. I already re-routed the hood release cable because if it's above that hose, it will catch on the headlight lifting mechanism as it winds around.
_________________
erstwhile owner of just about every 924 variant ever made |
|
| Back to top |
|
|
!tom

Joined: 28 Aug 2006
Posts: 1941
Location: Victoria, BC Canada
|
| Posted: Fri Jun 07, 2013 12:10 pm Post subject: |
|
|
I'm going to need to replace my rad soon, so I'm considering this mod.
Some questions though.
- I have a two-fan setup already. Will this work with the 944 rad?
- I've already established that I can't fit a 944 tank as I don't have a 931. How would that impact this project?
_________________
78 924 NA
5-lug |
|
| Back to top |
|
|
ideola
Joined: 01 Oct 2004
Posts: 15550
Location: Spring Lake MI
|
| Posted: Fri Jun 07, 2013 2:16 pm Post subject: |
|
|
I'm not sure that the mounting points are identical between the 2L vs 2.5L fan shrouds. Also, I believe the 2.5L rad is thicker, so when you put the thicker 2L fan shroud on it, it might interfere somewhere. In particular, the 2L setup already brings the LHS fan connection really close to the A/C pulley. There's no more room for the fan shroud to go back that far.
I can do some checking on this tomorrow when I'm at the shop, but that would be my immediate concern. But one of the reasons for the switch is that the 2.5L setup has lighter weight, lower profile, and more efficient fans (6 bladed vs. 5 bladed on the 2L). So IMO it would best to get the rad + fan shroud as a bundle.
RE: the expansion tank, you'll need to figure out how to adapted the hoses for the NA to the 944 rad. I can't see this as being insurmountable, but the hoses I specified aren't going to work as-is. You may need to modify, splice, or find alternate hoses...perhaps even some generic flex hoses that could be manipulated to work. Again, I will have to look at the lone NA in my garage tomorrow to even give you an idea of what the impact would be for the hoses.
_________________
erstwhile owner of just about every 924 variant ever made |
|
| Back to top |
|
|
!tom
Joined: 28 Aug 2006
Posts: 1941
Location: Victoria, BC Canada
|
| Posted: Fri Jun 07, 2013 2:48 pm Post subject: |
|
|
FWIW, I'm planning on yanking the A/C compressor this weekend.
_________________
78 924 NA
5-lug |
|
| Back to top |
|
|
|

