 |
924Board.org
Discussion Forum of 924.org
|
| View previous topic :: View next topic |
| Author |
Message |
Eliza
Joined: 17 Aug 2015
Posts: 174
Location: Prov. Utrecht, The Netherlands
|
 Posted: Sun Oct 10, 2021 6:25 pm Post subject: First hurdle taken! Posted: Sun Oct 10, 2021 6:25 pm Post subject: First hurdle taken! |
 |
|
Just an update:
The later heater ducting is installed!
It was a bit of a fight I admit. Lots of head scratching and fiddling to get the mixing chamber wedged between the front of the heater box and the dashboard  . .
And then that scary idea that the heater controls from hell might not clear the additional ducting... but they do. Nicely  . .
Also, I realized that the cardboard channel to the dash vents ( behind the center speaker ) was badly warped and had gaping holes and tears, heating the center speaker hole more that the dash vents . So armed with a large roll of aluminium tape, I reconstructed it and sealed it against the air outlet from the heater box.
I have to say, now even with the stock fan, airflow to the dash vents is greatly improved. I'll still go for a replacement fan, but I reckon that repairing the cardboard already solved a great part of the poor demisting.
All is buttoned up again, now I'm waiting for my fan to be delivered
More to follow!
Eliza
_________________
1985 924 NA RoW
1981 931 S2 RoW |
|
| Back to top |
|
 |
MikeDanger

Joined: 21 Nov 2002
Posts: 770
Location: Denver
|
| Posted: Sun Oct 17, 2021 6:54 am Post subject: |
|
|
I swapped my car (with A/C deleted) to blow through the main vents all the time using the plastic front duct (which I pulled off a 944) if You look you can see the "exit" on the main air flow box is already there, just blocked off.
and they I rearranged the round hoses, just like they did on the 944 (and if you get those parts from a 944 be sure to get the PLUGS)
As for the blower, I was looking at a blower motor from a GM such as this:
https://www.ebay.com/itm/233662694646 (not the squirrel cage, JUST the motor) as GM blowers are usually pretty powerful.
and I was just going to CUT out the stock motor from the top as I really don't want to pull the dash apart again, and mess with the heater core.
_________________
It was either this or a giant box of legos |
|
| Back to top |
|
|
924RACR

Joined: 29 Jul 2001
Posts: 8817
Location: Royal Oak, MI, USA
|
| Posted: Sun Oct 17, 2021 8:26 pm Post subject: |
|
|
@Mike - yeah, that's the same kind of design as I have for my Chrysler minivan blower... same deal, cage is pointing the wrong way, but as a start at least using the newer, faster fan... maybe there's a way to flip the cage and make it pull past the motor and out...
...and now, unrelated, after pulling the engine on my Turbo, I realize one of my rad fan motors is extremely wobbly, like no bearing on the front end. Still runs, but gotta see if I can just replace that one bearing while it's out...
_________________
Vaughan Scott
Webmeister
'79 924 #77 SCCA H Prod racecar
'82 931 Plat. Silver
#25 Hidari Firefly P2 sports prototype |
|
| Back to top |
|
|
Eliza
Joined: 17 Aug 2015
Posts: 174
Location: Prov. Utrecht, The Netherlands
|
| Posted: Wed Oct 20, 2021 6:52 pm Post subject: |
|
|
Update, and change of plan.
I finally managed to find out specs of the old fan motor. It’s a 9 amp motor, and even with far superior fin design I doubt that my replacement fan with 4,3 amps will improve airflow as I had planned. Fortunately, the fan was on back order so I cancelled my order.
Now. What to do? I toyed with the idea of dismantling the motor out of a new Golf/Jetta/Audi 80 blower ( that is practically the same as the later 924 blower motor and use it to replace just my stock fan motor. The fins of the old stock motor should fit on the new one with not much, if any, adjustments. I believe the shaft of the new motor may be 7mm as opposed to the 6mm on the old one, easily sorted by enlarging the hole in the propeller.
BUT… as the later heater system is fused with 25amps, I wonder if my 16amp heater controls will withstand the extra strain for long. And I would want thicker gauge wiring to accommodate more power. Hassle. Hmpf.
So for now, after comparing the wiring diagram of both heaters, I decided to try this:
I’ll use an ignition-on wire to power the heater fan via a relay that I’ll draw power for directly from the battery plus via an inline fuse, and add a ground crown in my center speaker enclosure for a clean ground. That way, I should be able to minimize unwanted resistance from the fuse box and old wiring.
I’ll see what effect that has before I move forward with more drastic measures.
Wonder where this will end   
Eliza
_________________
1985 924 NA RoW
1981 931 S2 RoW |
|
| Back to top |
|
|
MikeDanger
Joined: 21 Nov 2002
Posts: 770
Location: Denver
|
| Posted: Wed Oct 20, 2021 7:24 pm Post subject: |
|
|
couldnt you just pull the fan off of one of those cheapo "turbo" desk top fans?
_________________
It was either this or a giant box of legos |
|
| Back to top |
|
|
morghen

Joined: 21 Jan 2005
Posts: 8887
Location: Romania
|
| Posted: Thu Oct 21, 2021 6:12 am Post subject: |
|
|
Ah cmon, why did you let those numbers change your mind?
Newer motors draw less amps but rotate faster and move a lot more air.
And for a few euros its really worth the try.
The alternative sounds silly to me...i mean..to start changing wiring now..or butcher another car for another crap fan...or add wiring and stuff..i'd much prefer to try a new fan.
Regardless of what you will choose, i will try the new fan on my buddie's car for sure.
I'm thinking at those modern small radiator fans...i'm worried that it will blow too much air honestly.
_________________
https://www.the924.com |
|
| Back to top |
|
|
Eliza
Joined: 17 Aug 2015
Posts: 174
Location: Prov. Utrecht, The Netherlands
|
| Posted: Mon Oct 25, 2021 2:48 pm Post subject: |
|
|
Challenging me, are you?
Ok, how about this. I'll order the fan I originally wanted to compare the output to the one from a brand new, later style blower. Then at least, we'll have a direct comparison of efficiency before hacking into the existing heater system.
If the rad fan isn't up to the job I can always return it for a refund.
Eliza
_________________
1985 924 NA RoW
1981 931 S2 RoW |
|
| Back to top |
|
|
morghen
Joined: 21 Jan 2005
Posts: 8887
Location: Romania
|
| Posted: Mon Oct 25, 2021 4:59 pm Post subject: |
|
|
Well its not going to be easy to compare as the newer version of the 924 hvac fan is one type and has a shroud that focuses all the flow trough a small area (something like a turbo) while the rad fan and the old style 924 hvac fan is a conventional propeller fan with the flow area being much larger.
So to do even a half way to decent comparison you would have to build a sort of a shroud to force the propeller fan flow trough an area similar to the other fan.
But even so, i think you will be impressed with what a modern radiator fan can do, especially compared to the old tired oem fan.
Maybe the later style OEM fan will be better but it will require way too much work, time and money to implement compared to just a quick hack job on the housing of the existing setup.
In the end i think you will never revert to the original old style fan anyway so cut away 
My buddy is leaving his car to my care today or tomorrow, i'll order a new fan to match pretty soon and i'll just wire it up in place of the old one.
I think i'll try to do a sort of a measurement by sticking a thread next to a central vent and cranking the fan speed to max, then measuring how many cm of wire hang in the air for both setups.
_________________
https://www.the924.com |
|
| Back to top |
|
|
Eliza
Joined: 17 Aug 2015
Posts: 174
Location: Prov. Utrecht, The Netherlands
|
| Posted: Wed Oct 27, 2021 2:44 am Post subject: |
|
|
I DID IT!
My new fan arrived today, so I couldn't very well avoid the removal of the stock fan any longer  . It was a bit scary I have to say, sinking my soldering iron into the 6 plastic arms holding the fan motor... but anyways, no way back now. . It was a bit scary I have to say, sinking my soldering iron into the 6 plastic arms holding the fan motor... but anyways, no way back now.
I used to soldering iron rather than a saw-type tool to spare myself getting plastic shrapnel on my heater core. BIG stink 
I temporarily fastened the new fan with a couple of tie wraps and put power to it from a spare battery. Then I sat in the car and was BLOWN AWAY. Seriously, this is what I was after. By comparison, the later heater blower in my 1985 n/a seems lame.
Highly recommended mod!
Now all I need to do is figure out how to fix the fan in place more permanently, and button everything up. And, of course, test if the resistors work with the new fan - no idea what voltage it needs to see to switch on.
And then I'll want to go see if I can at all remove the defrost/footwell flap with the heater box still in the car as this needs new foam. Even with the footwell closed off completely, stuff in the footwell gets blown in the direction of the doors now. AIRFLOW! LOTS of it! Love it!
Happy bunny dance! Thanks Morghen for the encouragement!
Eliza
_________________
1985 924 NA RoW
1981 931 S2 RoW |
|
| Back to top |
|
|
924RACR
Joined: 29 Jul 2001
Posts: 8817
Location: Royal Oak, MI, USA
|
| Posted: Wed Oct 27, 2021 2:54 am Post subject: |
|
|
Great news!! Looking forward to pics...
_________________
Vaughan Scott
Webmeister
'79 924 #77 SCCA H Prod racecar
'82 931 Plat. Silver
#25 Hidari Firefly P2 sports prototype |
|
| Back to top |
|
|
morghen
Joined: 21 Jan 2005
Posts: 8887
Location: Romania
|
| Posted: Wed Oct 27, 2021 6:45 am Post subject: |
|
|
Hey!! Amazing news! Woohoo!
The 924 moves forward into the modern world by another small step because of us!
Looking forward to read about the final installation and follow your steps on my friend's early 924...which is currently parked in front of my house.
EDIT: Can i see some pictures of your 85? Mine has some small differences from the 84 and older 924s and i'm wondering if they were all made the same in 85. For example, heated windscreen sprinklers, electric boot opener like the 944, 944 sway bars, one additional frequency valve on the CIS.
_________________
https://www.the924.com |
|
| Back to top |
|
|
Eliza
Joined: 17 Aug 2015
Posts: 174
Location: Prov. Utrecht, The Netherlands
|
| Posted: Thu Oct 28, 2021 5:50 pm Post subject: |
|
|
Morghen,
the heated washer jets were an option, I don't have those. The boot opener, yes. Very practical! Frequency valve? Ehh.. no idea really. Where would it be, if it were present?
The sway bars are, as far as I'm aware, not off of a 944.
If you let me know specifically what you want photos off I can take them one of these days.
I wrote a little how-to on heater fan replacement. Maybe you guys would be so kind and proof read for plausibility before I add the photos? It's a bit hard to judge whether or not your own writing makes much sense to others 
See below, and thanks in advance!
Eliza
_________________
1985 924 NA RoW
1981 931 S2 RoW |
|
| Back to top |
|
|
Eliza
Joined: 17 Aug 2015
Posts: 174
Location: Prov. Utrecht, The Netherlands
|
| Posted: Thu Oct 28, 2021 5:54 pm Post subject: |
|
|
Heater Fan Upgrade early 924 heater box
Replacing your tired old stock fan is not so hard, although not for the purists. This procedure involves removing/destroying the original fan motor mounting struts, so think if you want to spend the time to pull the dash, center console, heat exchanger and ultimately, the heater box to get at the fan the factory-intended way… or rather not 😎.
The dimensions of the stock fan: Propeller diameter is 170mm, stay below that when choosing a replacement. That includes the fan cage, if applicable.
Amperage of the stock motor is 9amp max, if you manage to find a fan that stays below that, you should be able to leave the stock wiring and fuse as-is.
Look at modern rad fans that are lightweight and find one that has as high an air displacement as you can find. Suction fans usually displace more air than blowing ones. Check, if possible, if your chosen fan can handle being switched via a resistor so you get to keep the switching settings.
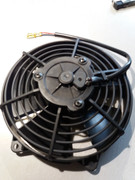
Just for reference, the fan I chose has the following specs:
Suction fan
Propeller OD 140mm
Cage OD without mounting tabs 154mm
Depth 58.1mm
Air flow full speed 610 m3/h
Amp max 5.5
Weight 0.38 kg
IP68
Before you start, disconnect the battery. Just because.
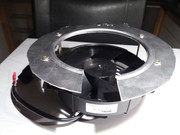
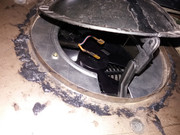
First, remove the fan shroud. This is fastened with three clips that can be extracted with a flat-bladed screwdriver. All around the underside, there’s a ridge in the shroud filled with what is generally referred to as “gorilla snot” – use a wide blade-type tool to gently loosen the goo all around the circumference of the shroud, and carefully wiggle it out. Set aside.
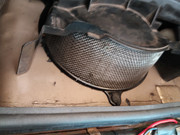
Traces of gorilla snot sticking to the bodywork around the fan hole can easily be removed with a rag/paper towel doused with WD 40 or some such. Wipe clean when done and degrease, otherwise the new gorilla snot will smear and not stick well later, when remounting.
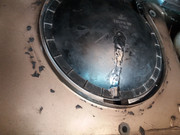
Next, carefully remove the “saucer”. This is done the easiest by first pushing the fan control lever in the center console all the way to the right, into the fully open position. The pivoting joint can be separated at the pivot point with careful manhandling – I find it easier to bend the two tabs of the pivot joint holding it to the “saucer” slightly to each side and pull the saucer free. Do bear in mind, the plastic is old and brittle and may break if you’re not careful.
Now free the saucer at the windshield side by prying it free at the two hinge points. Set aside.
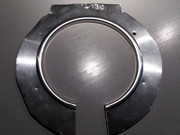
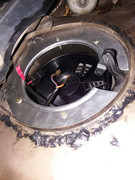
The fan and holding structure are now exposed. Undo the electrical connectors. Build a support structure to hold the fan once the struts are cut so the fan won’t fall onto your heat exchanger. Tie wraps and straps come to mind.
Breathe. Have a smoke or a coffee or a beer or whatever else helps you return to the still point at your center.
Now cut/melt/saw the six struts as close to the rim as possible and remove the fan. Set aside and revel in the thought that with current spare part prices, selling this old thing will easily cover the cost of the new fan you’ve already bought.
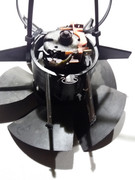
Use your ingenuity to construct a support structure for your new fan. Look at my pictures for inspiration or come up with something mind blowing yourself.
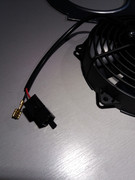
Do check the electrical connectors at your new fan. Those on the factory loom are female on the plus, male on the neg. side, settle this before test fitting so you don’t run into a snag at a later point.
Test-fit the fan and connect it to a spare battery, sit in the car and see before your inner eye golden pictures of quickly demisting windows… hold on to your baseball cap/hairpiece if you wear one, it might be blown right off your head.
Once you come to from this enlightening moment, fix the fan in place permanently, carefully remount the saucer and check its operation. Then remount the shroud with fresh gorilla snot, making certain it seals all the way around the opening in the bodywork. You do not want rain water running off the windshield to enter your heater box.
Bolt up whatever else you removed in the process, reconnect the battery and test operation of the fan controls. If all is well, do a happy dance and pat yourself on the shoulder. You’re done.
_________________
1985 924 NA RoW
1981 931 S2 RoW
Last edited by Eliza on Sun Oct 31, 2021 2:59 am; edited 1 time in total |
|
| Back to top |
|
|
DZGunner

Joined: 18 Nov 2014
Posts: 191
Location: Great white north
|
| Posted: Sat Oct 30, 2021 1:47 pm Post subject: |
|
|
waiting on pics

_________________
1979 924 (Daily driver EFI)
1979 924 Sebring
1977 924
1977 924 (Parts) |
|
| Back to top |
|
|
Eliza
Joined: 17 Aug 2015
Posts: 174
Location: Prov. Utrecht, The Netherlands
|
| Posted: Sun Oct 31, 2021 3:04 am Post subject: |
|
|
Pictures added .
Let me know if you have any questions.
I did find, by the way, that the actuator arm of the air flap sits approx. 3 cm below the opening if the air flap is fully closed. The upper edge of the fan cage therefore has to hang at least 3 cm down, otherwise the flap stays partially open.
Learning by doing, they call it, I guess I found this out AFTER everything was mounted. Not that it makes a big difference, but I know it would bug me in no time, so I tore everything apart again and lowered the fan.
All in all, just a few hours of work. I'm very happy with this!
Eliza
_________________
1985 924 NA RoW
1981 931 S2 RoW |
|
| Back to top |
|
|
|
|
You cannot post new topics in this forum
You cannot reply to topics in this forum
You cannot edit your posts in this forum
You cannot delete your posts in this forum
You cannot vote in polls in this forum
|
Powered by phpBB © 2001, 2005 phpBB Group
|

