 |
924Board.org
Discussion Forum of 924.org
|
| View previous topic :: View next topic |
| Author |
Message |
Peter
Joined: 04 Nov 2002
Posts: 379
Location: New York, NY
|
 Posted: Tue Jan 09, 2007 1:14 pm Post subject: How To Rebuild Calipers Posted: Tue Jan 09, 2007 1:14 pm Post subject: How To Rebuild Calipers |
 |
|
This How To details rebuilding 931 (5-bolt) front calipers. Although mounting hardware is different between the 924/931 5 and 4 bolt calipers, the rebuilding technique outlined below applies equally to all 931 and 924 calipers (not to mention 944 and early 928 calipers).
Parts & Tools:
1. Caliper Seals: Porsche Part # 928-351-941-00. Fits 944, 944S, 928 (78-81).
2. Caliper Mounting Hardware: Porsche Part # 944-351-95201. Fits 924 Sport/Turbo/GT/S, 944/S/Turbo.
3. Sandpaper: Grits 600, and 1000 (or equivalent).
4. Hammer, metal punches(wide and narrow), and awl.
5. MAPP/O2 gas torch (if unavailable, then a good penetrating liquid such as PB Blaster).
6. Sand blaster (if unavailable, then wire wheel for electric drill and metal brushes).
7. Paint (any hi-temp paint, or from my own positive experience on my 924 track car, Rustoleum enamel works excellently).
8. Air Compressor (if unavailable, then wide-jaw pliers and plenty of elbow grease).
9. Needle nose pliers.
10. Metal pick (or equivalent bent needle/safety pin)
11. Simple Green Degreaser (or equivalent dish/ clothes washing detergent)
12. Metric taps to clean bleeder screw and brake hose connections (or clean bolts of equivalent sizes).
Step 1
Remove calipers from spindles as per Porsche factory or Haynes manuals.
Step 2
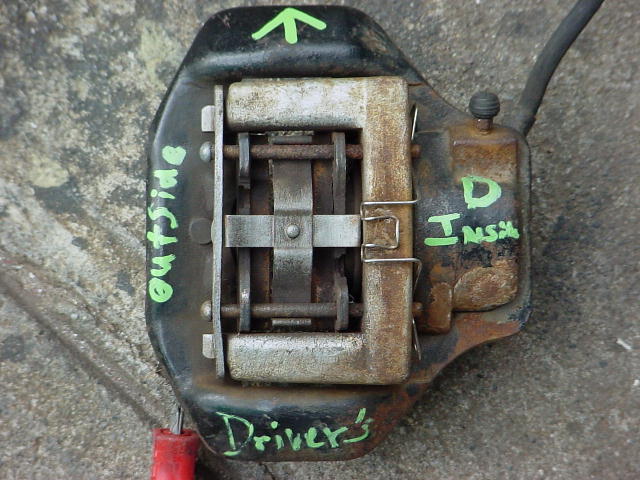
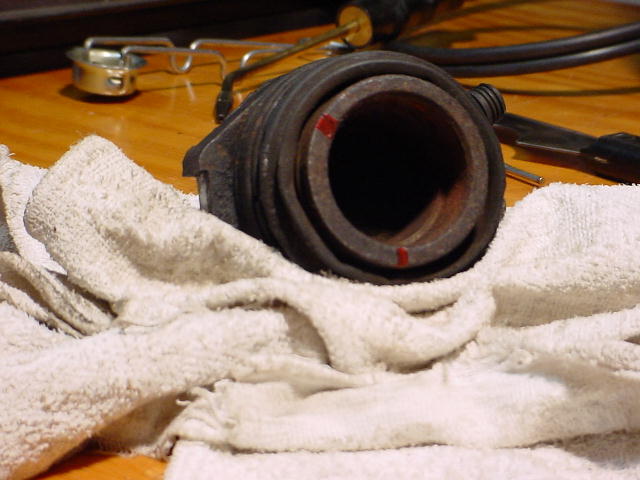
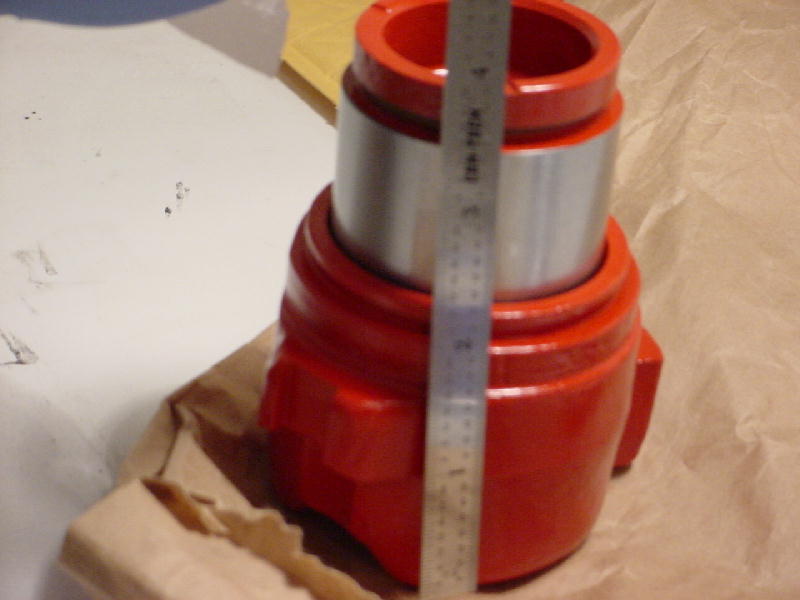
It is always a good idea to take a picture and notes of how the caliper and associated hardware is installed before you take it apart. See illustrative PIC below.
Step 3
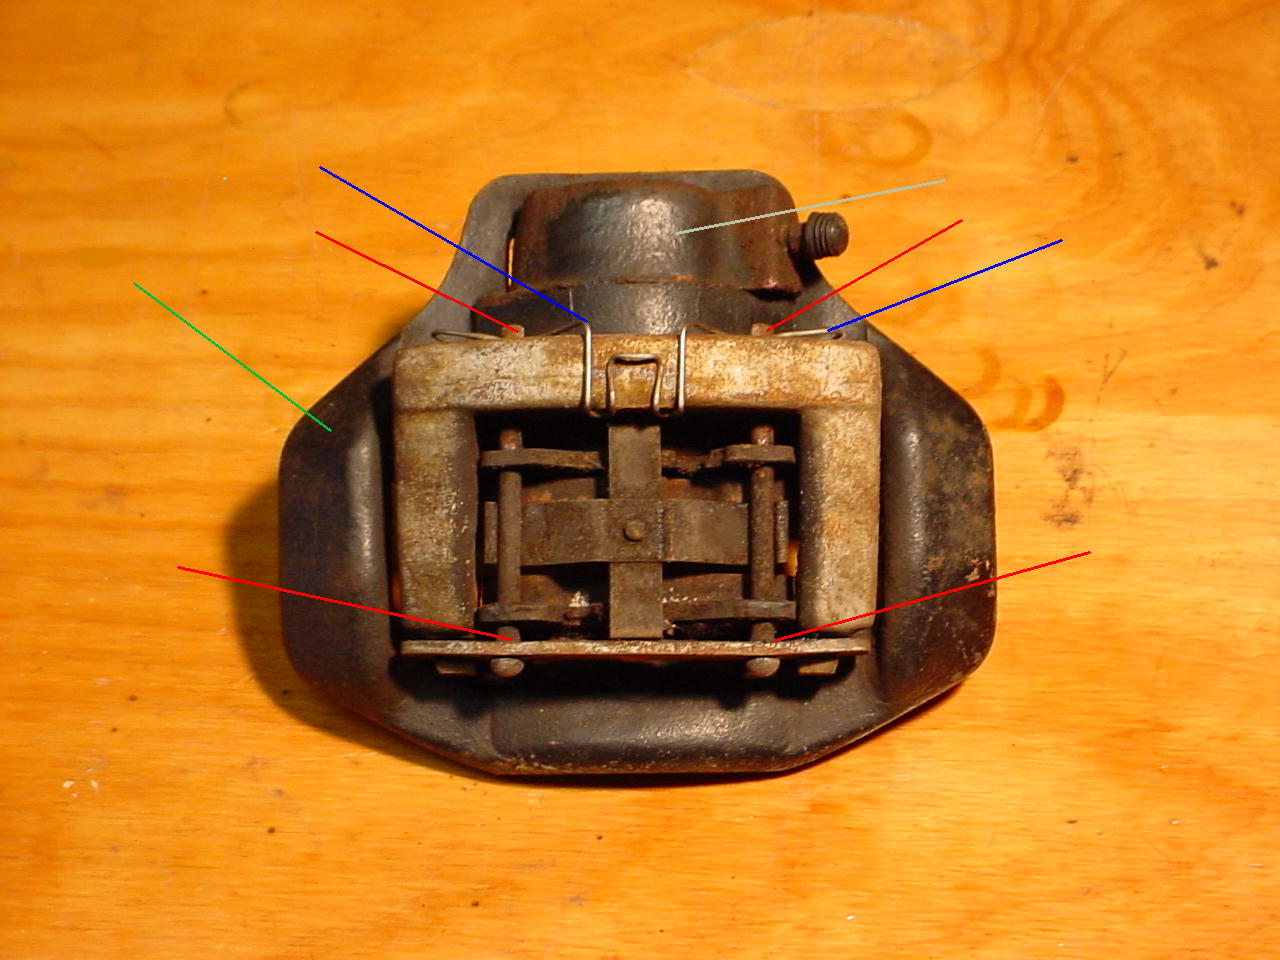
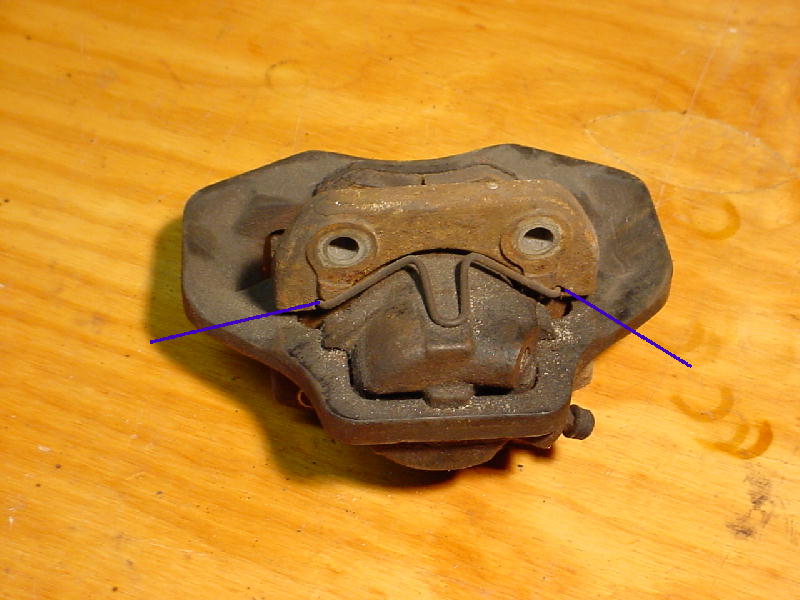
Removal of the brake pad mounting pins. The safety wire (denoted with the blue lines) holds the pins and is easily removed with needle nose pliers. Use a torch to mildly heat the pins where they come in contact with the brake mounting assembly (denoted with a green line) to break the rust/corrosion. The red lines denote the pins and the points that should be heated. Then use a hammer and wide punch to knock out the pins. If a torch is unavailable, then use plenty of penetrating fluid, and tap the parts to set up vibrations that help loosen the rust/corrosion. You will still need a hammer & punch, in addition to plenty of hammering.
Step 4
Removal of the caliper hold-down wire.
Once again, use a torch to heat the wire at the point it enters the brake mounting assembly (denoted with blue lines). Then knock the wire out with the narrow punch. If a torch is not available, use plenty of penetrating liquid in addition to hammering.
Step 5.
Separating the brake mounting assembly.
Basically same as above, in that you use a hammer & punch to separate the parts, in addition to a torch or penetrating liquid.
Step 6.
Marking piston to caliper bore alignment
There are two notches marked on the piston. To maintain proper piston alignment, use an awl to score a mark on the caliper perpendicular to each notch. I have used red paint to illustrate the notches on the piston. The scoring mark is not visible in the picture
Step 7
Removal of the brake cylinder from the caliper bore.
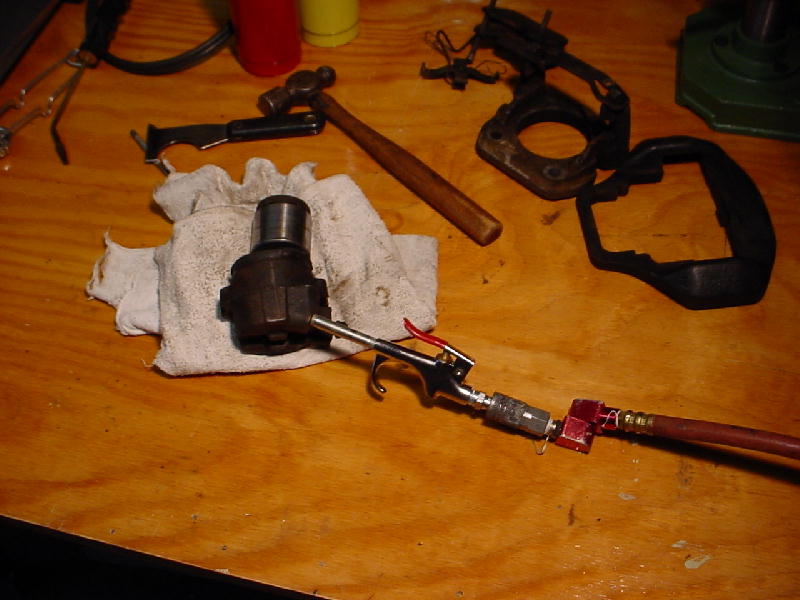
This is best done with an air compressor, either by using a threaded hollow rod that threads into the caliper bore at the brake hose inlet and the air gun (as per PIC below) or by using a rubber nipple on your air gun and pressing it firmly into the brake hose inlet. For safety, I place the caliper, piston side down on a rag on the floor, and gradually pressurize the caliper. For me, this has worked a 100% of the time. If compressed air is unavailable, then using a set of wide-jaw pliers, firmly grip the piston top only (the top is the part that comes in contact with the brake pad) and begin twisting and pulling the piston cylinder out. Good luck. I tried the pliers technique only once, and found it exhausting and time consuming.
Step 8
Cleaning the piston and caliper bore. Remove the caliper seal by using a pick to pullout the rubber seal on the inside of the caliper bore. Discard this item.
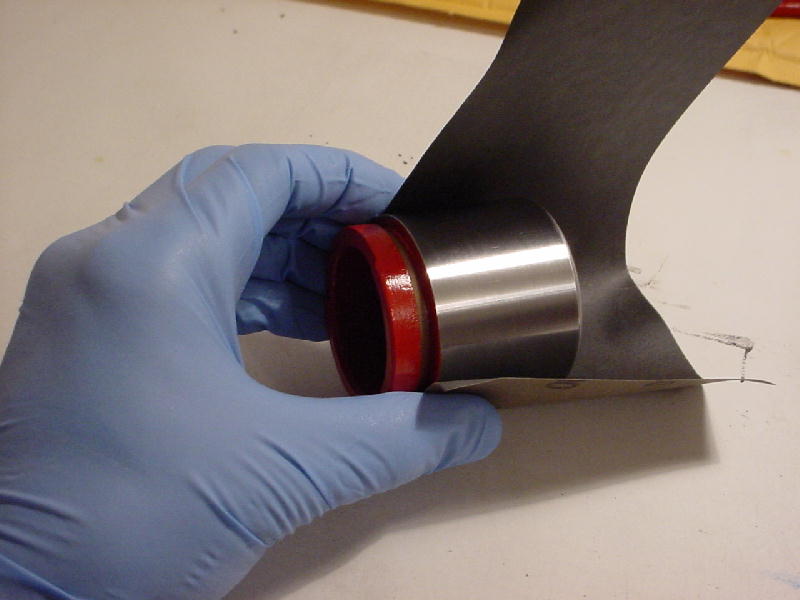
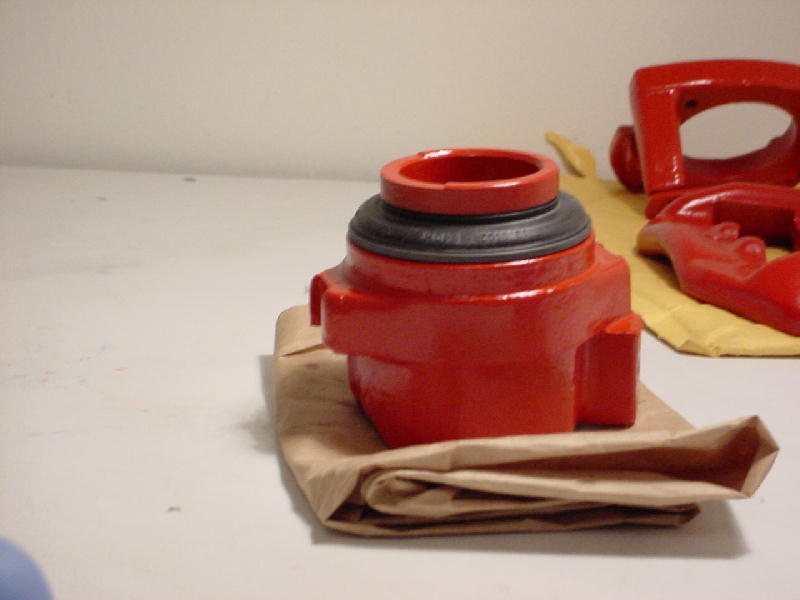
Next clean the piston and caliper parts by washing them with Simple Green degreaser. Towel dry. Using 600 grit sandpaper, wrap paper around the piston, and while submerging it under running water rotate the sandpaper 360 degrees around the piston several times until clean and shiny. Then repeat using 1000 grit sandpaper. If the piston is not pitted and resembles the piston pictured below, then it can be reused. Do the same for the caliper bore, by rubbing sandpaper along the inside walls and the ridge where the rubber caliper seal rests. It is important for this area to be free of pitting because leaking will occur if a tight seal is not made. Examining the caliper bore may reveal some minor pitting on the bottom. This is acceptable. However, pitting is not acceptable on the bore walls, ridge seal, or piston. If your piston and caliper bore cannot be reused, discard them and buy a good used set and try again.
Step 9
Cleaning and painting calipers.
I like to sandblast my parts with an inexpensive Harbor Freight sanding gun (looks like a paint gun). Make sure to protect the piston and caliper bore from sand by wrapping them in duct tape. Although not as effective, one can also use a wire wheel attached to an electric drill and wire brushes.
With metric taps, or equivalent metric bolts, clean the threads where the bleeder screw and brake line screw into the caliper.
After cleaning, paint the parts to protect them from the future rusting. Although for these calipers (going onto my 931 track car) I used red hi-temp spray paint, I have used Rustoleum enamel for my 924 track car and the calipers and drums still look good.
Step 10
Putting it all back together.
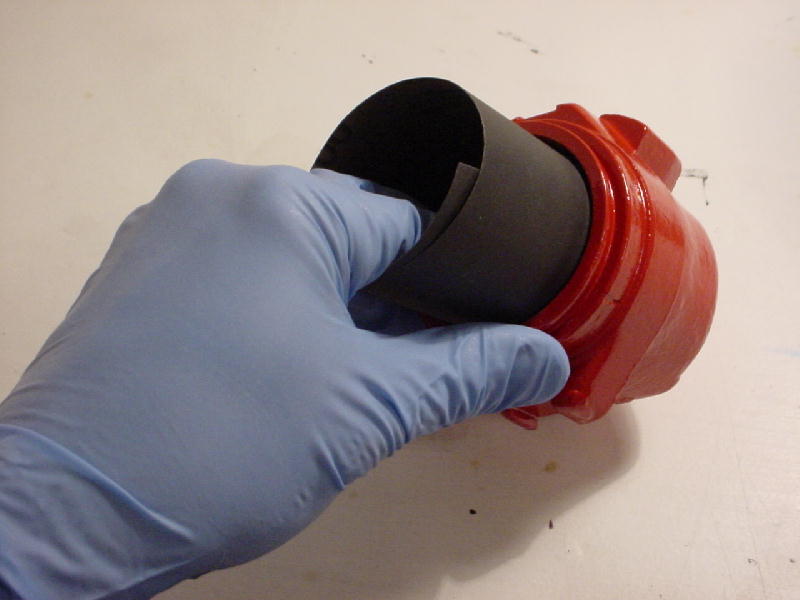
With fresh brake fluid, spread some fluid over the caliper bore, new rubber seal, and piston. Press the seal into the ridge of the bore. Place the piston over the bore, and align the piston notches to the marks on the caliper made in Step 6 above. The fuzzy pic below shows me using a metal ruler to align the notch on the piston with the mark I earlier scribed onto the caliper housing.
Place the caliper face down on a rag and firmly press the caliper down onto the piston.
Install the dust shield by pulling it over the piston first, then the caliper. Then place the circlip over the dust shield on the caliper side.
Next, push the caliper onto the brake mounting housing. Refer to your notes/pics from Step 2 if you forgot which side is right side up.
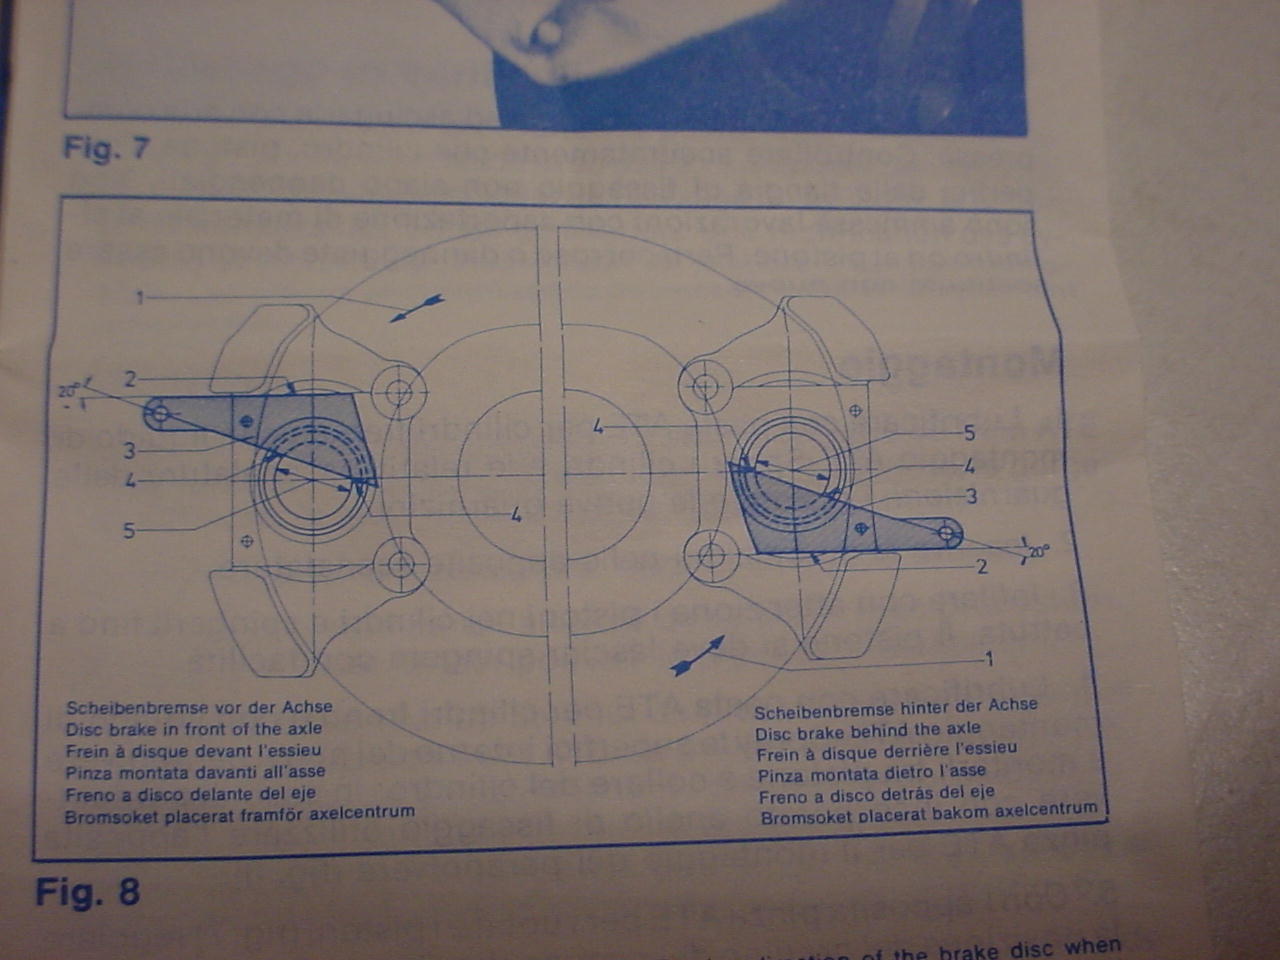
Step 11
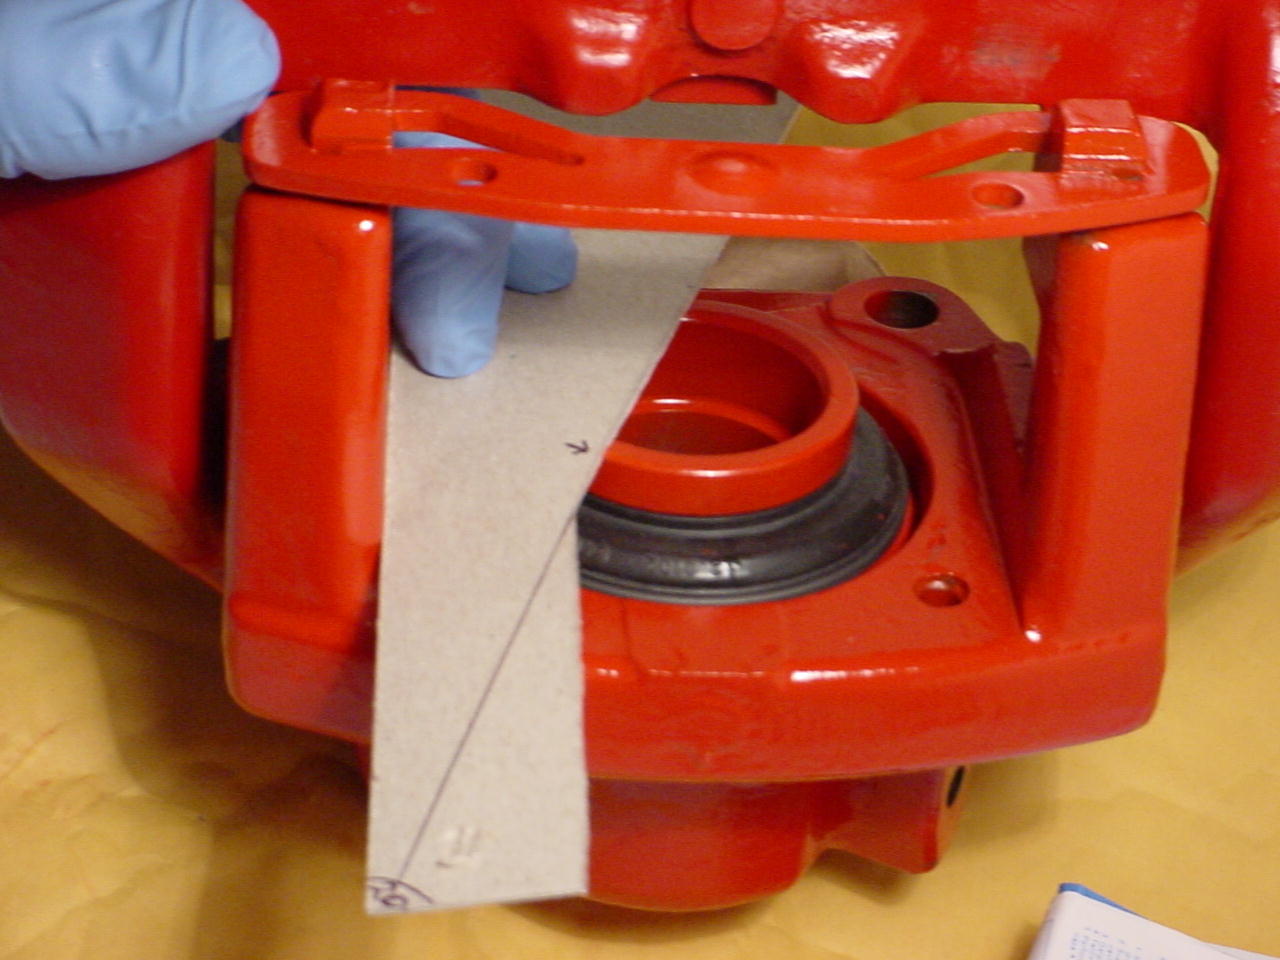
Piston to Bore Alignment Check.
The notches in the piston must be oriented at 20 degrees to the brake mounting assembly. Why? I dont know, but both the Porsche Factory Manual and the instructions with the caliper- rebuild kit say so! (Seriously, I have researched the subject but have not found a satisfactory answer.) To verify alignment, I made a simple 20 degree triangle out of cardboard to recreate the Porsche tool used to align the piston. The tool rests against the brake mounting assembly and the 20 degree angled cardboard must align with the notches on the piston. As per the pic below, the initial markings from Step 6 are spot on and no further adjustment in alignment is necessary. If alignment is necessary, simply turn the piston.
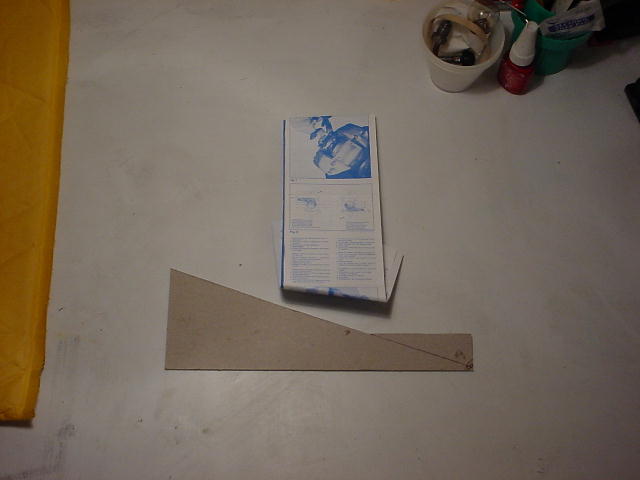
Below are pictures of the gauge being used, along with the gauge, and finally a close-up of the instructions showing alignment procedure.
Step 12
Screw in the bleeder screw, bolt it back up to the spindle, and attach the brake hoses.
Bleed as usual. You are done! 
Last edited by Peter on Wed Jan 10, 2007 1:54 am; edited 1 time in total |
|
| Back to top |
|
 |
Ozzie

Joined: 12 Mar 2005
Posts: 4448
Location: Townsville, Qld. Australia
|
| Posted: Tue Jan 09, 2007 7:52 pm Post subject: |
|
|
Very informative and great pics.
_________________
Porsche 924 1984 (UK import) NA
Its AUTO and its BLACK
Montego Black on black/red
Engineer of Electro/Mechanical Systems Maintenance |
|
| Back to top |
|
|
Peter
Joined: 04 Nov 2002
Posts: 379
Location: New York, NY
|
| Posted: Wed Jan 10, 2007 6:01 am Post subject: |
|
|
| Ozzie wrote: | | Very informative and great pics. |
Thanks for the compliment Ozzie! |
|
| Back to top |
|
|
macBdog

Joined: 16 Aug 2004
Posts: 1111
Location: Brisbane, Australia
|
| Posted: Wed Jan 10, 2007 9:48 am Post subject: |
|
|
Great job. You have high attention to detail. I will be trying to match your quality of work for the set of 911 brakes I am doing at the moment.
_________________
1979 931 with a 350 chev
1973 911E with EFI
| p-talk wrote: | | I'm still convinced the word 'Porsche' makes people crazy in all kinds of ways |
|
|
| Back to top |
|
|
Peter_in_AU

Joined: 29 Jul 2001
Posts: 2743
Location: Sydney, Australia
|
| Posted: Wed Jan 10, 2007 8:28 pm Post subject: |
|
|
WOW that is soooooo good!!
_________________
1979 924 (Gone to a better place)
1974 Lotus 7 S4 "Big Valve" Twin-cam (waiting)
1982 924 (As featured on Wikipedia)
Learn to love your multimeter and may the search be with you |
|
| Back to top |
|
|
Joes924Racer

Joined: 03 Nov 2002
Posts: 11964
Location: Oregon, Denver Colorado native!
|
| Posted: Wed Jan 10, 2007 11:29 pm Post subject: |
|
|
Outstanding Peter
just what I was looking for.
_________________
1979 porsche 924 Na
1980 porsche Turbo 931GT Replica
Have u ever driven a turbo. |
|
| Back to top |
|
|
Peter
Joined: 04 Nov 2002
Posts: 379
Location: New York, NY
|
| Posted: Sun Jan 14, 2007 5:18 am Post subject: |
|
|
| Thanks all! |
|
| Back to top |
|
|
Rasta Monsta

Joined: 12 Jul 2006
Posts: 11724
Location: PacNW
|
| Posted: Sun Jan 14, 2007 5:54 am Post subject: |
|
|
Hey Peter, are these still off the car? I don't suppose you can share the stampings on the different parts. . .
I swear, they looked identical until after I threw them all in the cleaning pile. . .

_________________
Toofah King Bad
- WeiBe (1987 924S 2.5t) - 931 S3
|
|
| Back to top |
|
|
Peter
Joined: 04 Nov 2002
Posts: 379
Location: New York, NY
|
| Posted: Mon Jan 15, 2007 4:21 am Post subject: |
|
|
| Rasta Monsta wrote: | Hey Peter, are these still off the car? I don't suppose you can share the stampings on the different parts. . .
I swear, they looked identical until after I threw them all in the cleaning pile. . .
|
Guess you missed Step 2 above.
This is what I have for the passenger front, 5 bolt, 931 brake caliper unit.
ATE 17: Mount with bolt holes, which attaches the caliper unit to the spindle.
ATE 28: Caliper bore.
ATE 07: Mount to which the brake pads attach onto.
I hope it helps. |
|
| Back to top |
|
|
Paul

Joined: 02 Nov 2002
Posts: 9491
Location: Southeast Wisconsin
|
| Posted: Mon Jan 15, 2007 4:50 am Post subject: |
|
|
Great work!!
If you don't have an air compressor, you can pop the pistons most of the way out with the brake pedal (before removing the brake hoses).
_________________
White 87 924S "Ghost"
Silver 98 986 3.6l 320 HP "Frank N Stein"
White 01 986 "Christine"
Polar Silver 02 996TT. "Turbo"
Owned and repaired 924s since 1977
Porsche: It's not driving, it's therapy. |
|
| Back to top |
|
|
Rasta Monsta
Joined: 12 Jul 2006
Posts: 11724
Location: PacNW
|
| Posted: Mon Jan 15, 2007 7:22 am Post subject: |
|
|
Actually I was referring to left vs right.
_________________
Toofah King Bad
- WeiBe (1987 924S 2.5t) - 931 S3
|
|
| Back to top |
|
|
Lizard

Joined: 03 Nov 2002
Posts: 9364
Location: Abbotsford BC. Canada
|
| Posted: Fri Jan 26, 2007 4:03 am Post subject: |
|
|
a couple of notes I would like to add to this,
left and right the only parts that make a difference are the piston housing.
You can tell left and right piston housing apart by the location of the bleeder valve, it ALWAYS is pointed up to allow air to escape. As long as you know this you never need to mark the caliper as to which side it went on.
I would strongly recommend while you are doing this to replace the front rubber brake lines, preferably with stainless braided lines, but factory replacement are fine as well. The reason is these lines rot and send rubber particels into your fresh new caliper.
You should not need to sand the inside of the bore with sandpaper once it is cleaned.
Make sure that if you sandblast the parts, do everything EXCEPT the shiny part of the piston, in other words you can do the outside lip and the inside of the piston no more. You may also consider just threading an old bleeder into the hole when doing the caliper housing.
When doing this I doubt the kits come with new bleeder valves but I would STRONGLY recommend that, nothing worse than putting it all together then getting to your next brake fluid change and breaking the old bleeder off in the caliper.
When removing the blake piston, DO NOT disassemble the caliper first! Remove the pins holding the old pads in and either put the old pads in or a block of wood in for the piston to exit onto when you remove it with compressed air. If you do not there is a very high likely hood of that piston ejecting across the room and possibly killing someone. Whatever you use for the cushion you want it to be thick enough so that the piston cannot exit the bore of the caliper.
There is one other way to do this. You can disassemble the entire unit as shown above with the piston left in the bore and then put the unit into a vise, close the vise so that it is touching the piston and the other side of the caliper and then apply air, MAKE SURE to watch your fingers if you wish to keep them all. as you hold some air into the caliper undo the vise this will allow for a controlled removal of the piston. Once the piston exits it will just pass the seal and it will tend to cock up or down, if you use too much PSI of air the cocking could mark the piston making it non reusable.
please excersize caution when performing this task though
_________________
3 928s, |
|
| Back to top |
|
|
Rasta Monsta
Joined: 12 Jul 2006
Posts: 11724
Location: PacNW
|
| Posted: Fri Jan 26, 2007 4:13 am Post subject: |
|
|
| Lizard wrote: | a couple of notes I would like to add to this,
left and right the only parts that make a difference are the piston housing |
Glad to hear this. I swear, they look absolutely identical, but when I saw they had different stampings I became a little concerned. . .
_________________
Toofah King Bad
- WeiBe (1987 924S 2.5t) - 931 S3
|
|
| Back to top |
|
|
kcoyle

Joined: 15 Jan 2011
Posts: 712
Location: Long Island, NY
|
| Posted: Thu Dec 15, 2011 10:14 am Post subject: |
|
|
Excellent writeup. I'm in the middle of it now and would like to add that one should not get too crazy with the cheeze whiz (torch) heating the caliper hold down wire too much or you will wind up with this.
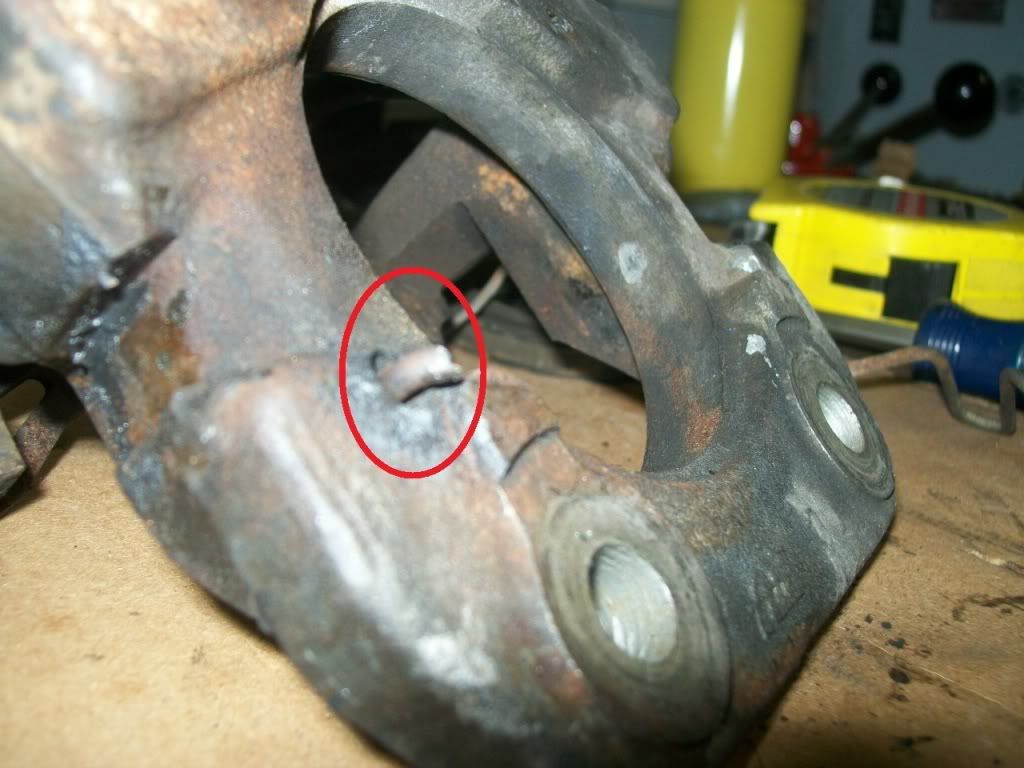
$40.23 for two new wires.
_________________
1982 931- Stock with MBC at 8psi
Relax, all right? My old man is a television repairman, he's got this ultimate set of tools. I can fix it. |
|
| Back to top |
|
|
sbarc

Joined: 01 Feb 2010
Posts: 545
Location: West Coast of Canada
|
| Posted: Thu Dec 15, 2011 11:43 am Post subject: |
|
|
This is an excellent thread.
| Paul wrote: | Great work!!
If you don't have an air compressor, you can pop the pistons most of the way out with the brake pedal (before removing the brake hoses). |
That's the way I do it and I have an air compressor.
_________________
1981 931 (Canadian car)
1981 931 (US car)
1990 928GT (ROW car)
1991 Toyota MR2
1989 Toyota MR2 Super Charged
1985 Toyota Supra
1973 Triumph GT6
1971 Opel GT |
|
| Back to top |
|
|
|
|
You cannot post new topics in this forum
You cannot reply to topics in this forum
You cannot edit your posts in this forum
You cannot delete your posts in this forum
You cannot vote in polls in this forum
|
Powered by phpBB © 2001, 2005 phpBB Group
|

