| View previous topic :: View next topic |
| Author |
Message |
ideola

Joined: 01 Oct 2004
Posts: 15548
Location: Spring Lake MI
|
 Posted: Sun Apr 22, 2012 8:23 am Post subject: Purpose-built 36-1 Trigger Wheels now available for 924 2.0L Posted: Sun Apr 22, 2012 8:23 am Post subject: Purpose-built 36-1 Trigger Wheels now available for 924 2.0L |
 |
|
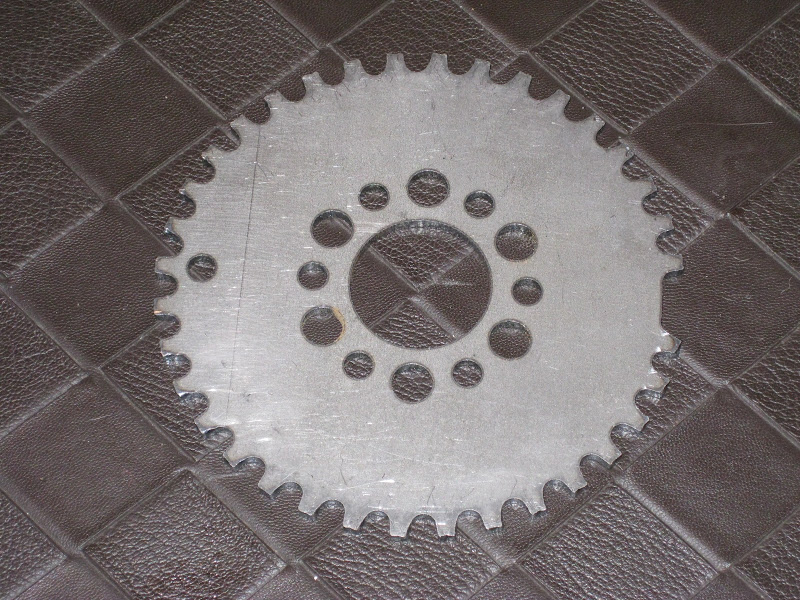
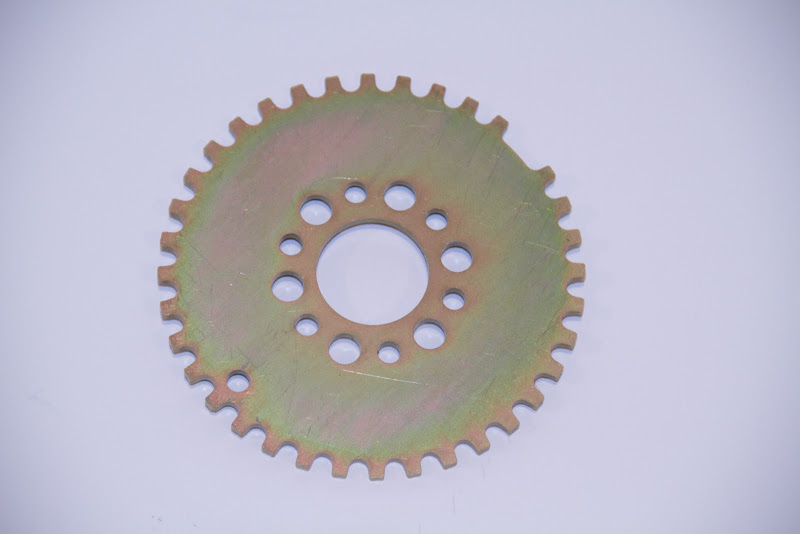
PRICE: $38 + shipping. 14 available for immediate purchase.
Now plated with yellow cad (see updated pix below).- Water-cut from mild steel
- .125" thickness
- 4.5" diameter
- Sandwich style installation between V-belt crank pulley and Gilmer pulley provides simple bolt-on installation with no welding, balancing, or concern about rotational alignment; i.e. once the V-belt pulley is torqued to the Gilmer pulley, the trigger wheel will be perfectly centered.
- Balance hole opposite the missing tooth
- Fully indexable to six different positions to allow each installer to determine the optimum placement for the pickup sensor
Now for some pix.
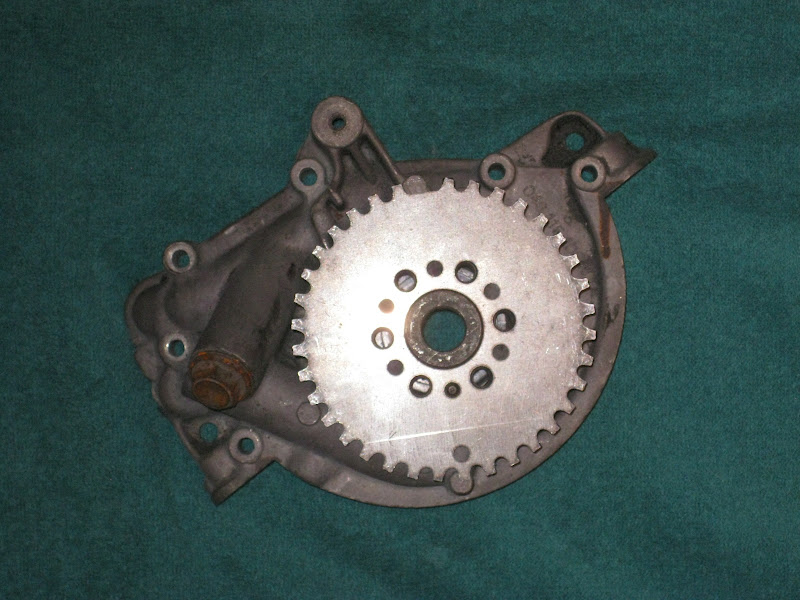
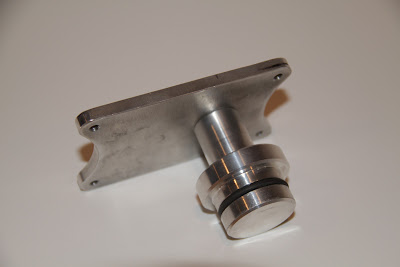
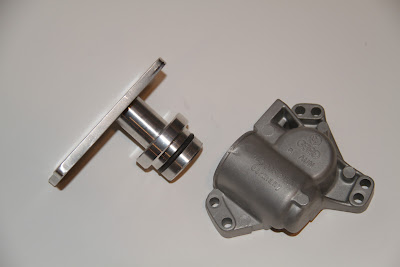
The following six photos depict the orientation of the oil pump with the Gilmer position at TDC. The sequence of shots shows how the trigger wheel can be installed in one of six positions to accommodate a variety of options for mounting the pickup sensor.
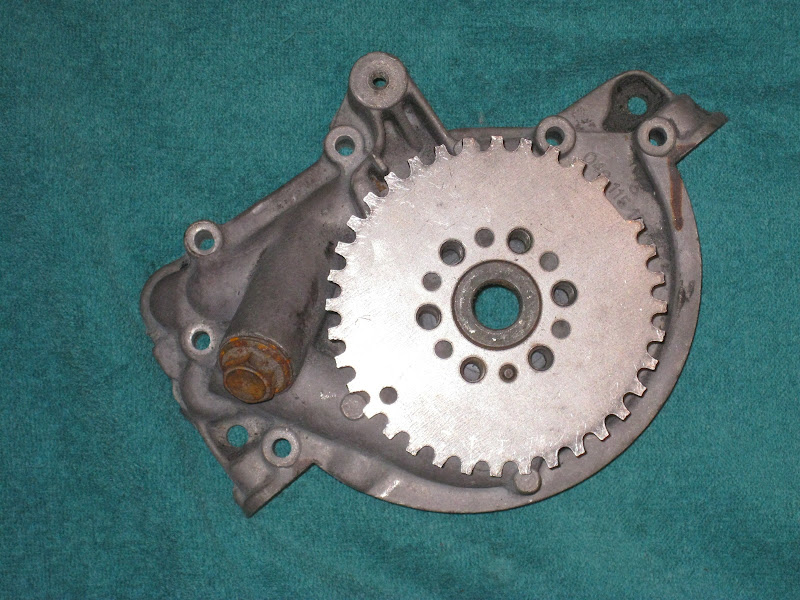


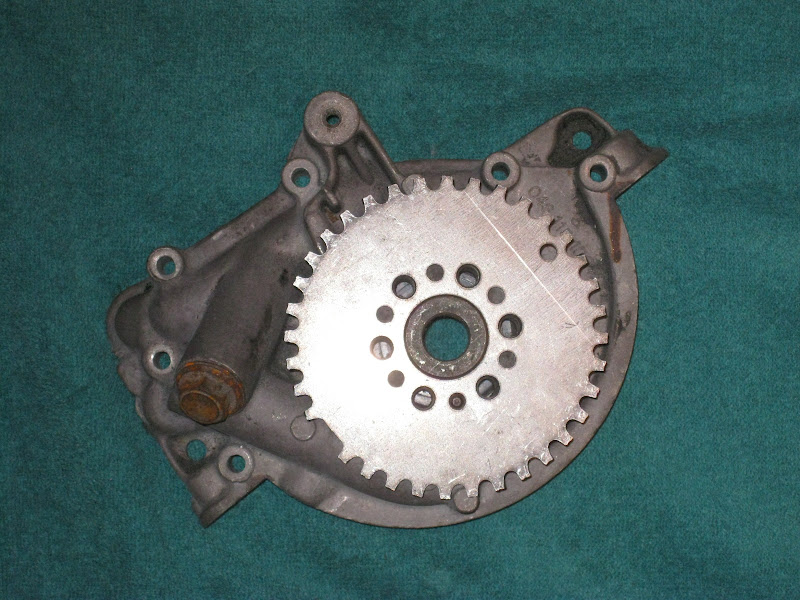
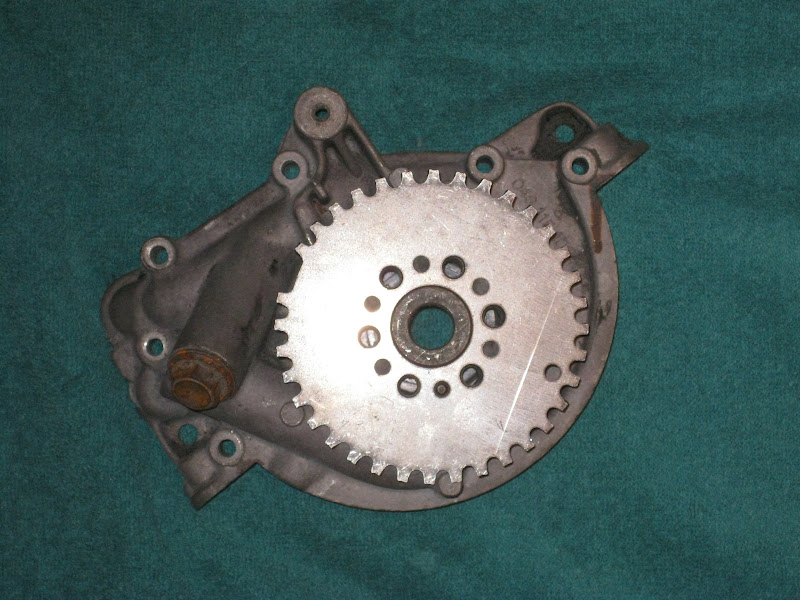
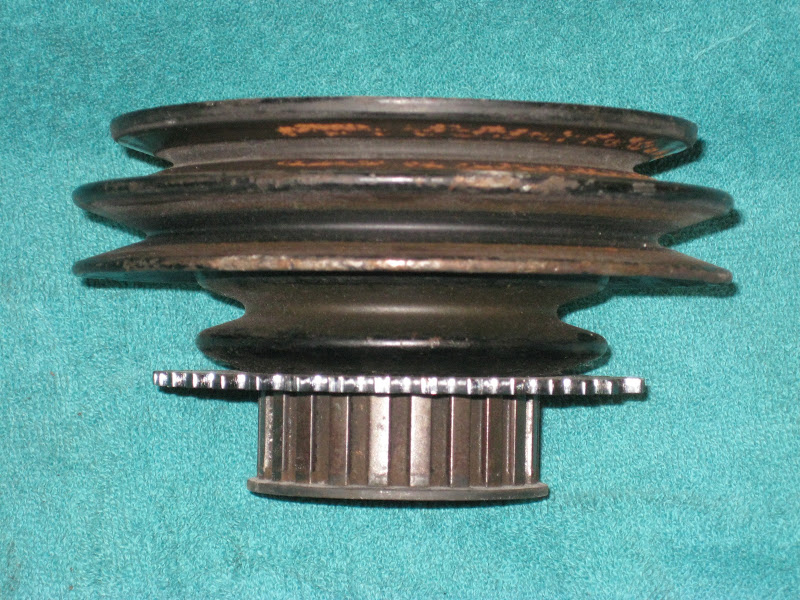
The following two photos depict how the trigger wheel is sandwiched between the V-belt crank pulley and the Gilmer pulley:

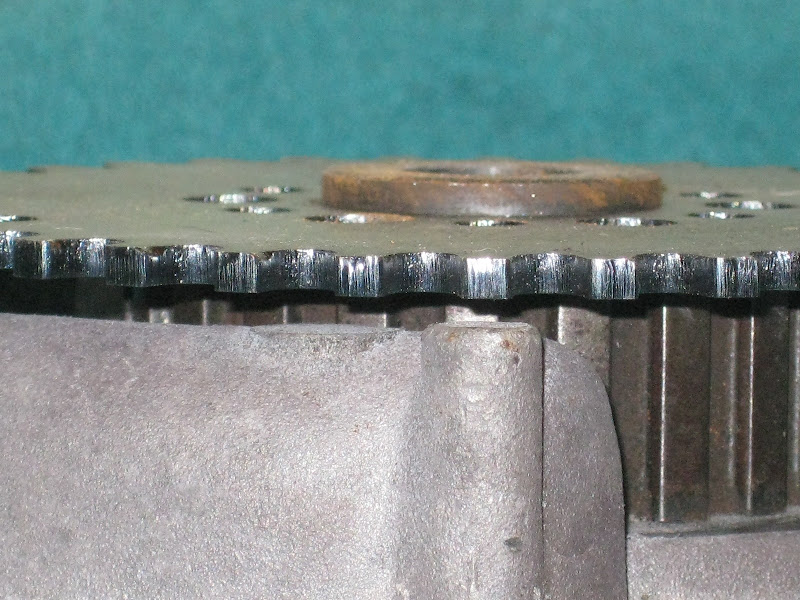
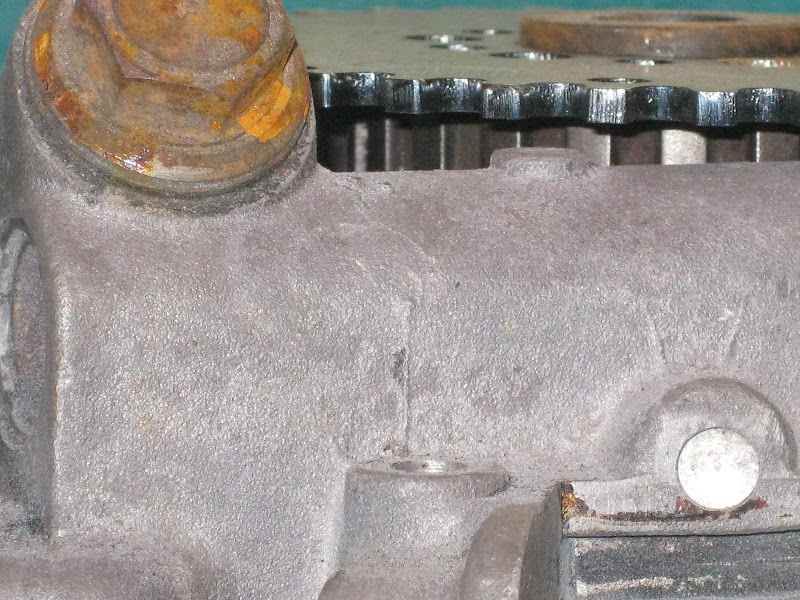
The following two photos depict the minimum clearance between the trigger wheel and the oil pump housing. In actuality, there will be more clearance than depicted because the Gilmer pulley does not press against the front oil seal (in these photos, the Gilmer pulley is bascially just sitting atop the seal); on an installed crankshaft, there is a mm or two of clearance between the Gilmer pulley and the seal, so there will be plenty of clearance between the trigger wheel and the oil pump housing when installed on a completed rotating assembly.
_________________
erstwhile owner of just about every 924 variant ever made
Last edited by ideola on Wed Dec 19, 2012 11:22 am; edited 2 times in total |
|
| Back to top |
|
 |
ideola
Joined: 01 Oct 2004
Posts: 15548
Location: Spring Lake MI
|
| Posted: Sun Apr 22, 2012 8:52 am Post subject: |
|
|
I forgot to mention, this approach will requires spacing out the pulleys for the water pump, alternator and A/C compressor to keep the V-belt grooves aligned. Here is how you do that:
For the water pump on both the 924 & 931:
Get three to six M8 washers. Get three M8x20 bolts (stock bolts are M8x16). Use the washers to space out the pulley by .125"; the holes in the water pump to which the pulley mounts are thru-holes so there should be no issue if there is a little extra length on the bolts. (I am investigating having a .125" thick version of the stock water pump spacer made up to stack with the OEM spacer, but I don't think it will be cost effective. Washers are cheap!).
For the A/C compressor on both the 924 & 931:
Get three to six M10 washers. Insert them BEHIND the large bracket. The stock bolts are M10x70 (qty 1) and M10x55 (qty 2). 1/8" of an inch should not make a big deal as these bolts are plenty long and have sufficient thread engagement; just make sure to properly torque them. If you're really concerned about it, get M10x75 and M10x60 bolts...but I'm not sure if they will bottom out in the blind holes in the block. You might need to space them a little further by putting washers on the front side, or grinding them down a tad. I am also contemplating having a single-piece spacer made for this application, but again, washers are cheap!
For the alternator on the 931:
Don't need to do anything further as the alt bracket sits atop the A/C bracket and will be carried forward by the above arrangement.
For the alternator on the 924:
Get three to six M8 washers. Space out the front triangular bracket that attaches to the water pump housing by placing washers BEHIND the bracket. Then use the additional washers to insert behind the upper mounting ear of the alternator, just in front of the rear bracket. It's possible that the rear bracket can be slid forward because it has elongated holes, but this will depend a lot on the condition of your bushings, so the best bet is to plan to space it out with washer as described. The long bolt for the upper alternator ear is M8x95, you may wish to get one that is M8x100. The two bolts for the water pump are M8x65 and M8x72. Use an M8x70 for the upper bolt, and an M8x75 for the lower bolt. (Note: I have not yet tested this out on the NA, so I don't know if the M8x70 bolt will bottom out in the blind hole in the block...it's possible you may have to grind it down a tiny bit).
_________________
erstwhile owner of just about every 924 variant ever made |
|
| Back to top |
|
|
tyfighter123

Joined: 19 Jan 2010
Posts: 551
Location: Colorado
|
| Posted: Sun Apr 22, 2012 10:29 am Post subject: |
|
|
Looks great! Add one to my cart.
_________________
Porsche 924 1977 N/A
Mustang GT/CS 2007
Porsche 924S 1987 (parts car)(cut up and recycled)
Porsche 911S 1976
Porsche 931 1980
Porsche 931 1980 (parts car) |
|
| Back to top |
|
|
Horizonblue

Joined: 13 Oct 2011
Posts: 307
Location: Sorring city, Denmark, Europe
|
| Posted: Sun Apr 22, 2012 5:58 pm Post subject: |
|
|
Excellent!
_________________
Euro 924, 1976
"If you can't fix it, don't break it"
/P.G. Andersen |
|
| Back to top |
|
|
flosho

Joined: 01 Jul 2004
Posts: 3155
Location: Eau Claire, Wisconsin
|
| Posted: Sun Apr 22, 2012 11:52 pm Post subject: |
|
|
That looks like a pretty sweet setup.
Any plans to build a sensor mount to go with it?
_________________
[This Space For Rent] |
|
| Back to top |
|
|
ideola
Joined: 01 Oct 2004
Posts: 15548
Location: Spring Lake MI
|
| Posted: Mon Apr 23, 2012 12:35 am Post subject: |
|
|
| flosho wrote: | | Any plans to build a sensor mount to go with it? |
In a word, Yes.
I'm investigating two different styles of pickup sensor, one that goes with the Ford EDIS stuff, and one with a threaded body. The former is really inexpensive (~$25), and would only require a simple flat bracket, no bends, but it would require slotted holes for being able to adjust the distance of the sensor to the trigger wheel. The latter is about 3x the cost of the Ford unit (~$75), and would require a basic L-bracket, but the threaded body could be more easily adjusted.
The most obvious pickup point seems to be off of the two big bolts on the front of the A/C bracket because this will position the sensor such that the missing tooth is 80° to 90° past TDC, which is pretty close to the standard setting for EDIS...of course, most modern ECUs including megasquirt allow you to adjust this in the settings...but this is a really convenient location that would work quite well with trigger wheel indexed as depicted in the first photo in the sequence above. I just need to confirm that it can be installed here without interfering with any of the stock A/C components and adjustments.
Another possible mounting location is the two bolts on the right side of the oil housing, but this will require some more sophisticated bends for the bracket...not a big deal for making it at home, but I'm trying to come up with something that will be as simple and cost-effective as possible for mass production.
As soon as I get my cheap-a$$ stroker block back from the machine shop, I'll have something to work with. I have all the parts I need to model both the NA and 931 setups.
_________________
erstwhile owner of just about every 924 variant ever made |
|
| Back to top |
|
|
!tom

Joined: 28 Aug 2006
Posts: 1934
Location: Victoria, BC Canada
|
| Posted: Mon Apr 23, 2012 2:29 am Post subject: |
|
|
Looks great. One possible change would be to offset the teeth from the mounting holes on the wheel in order to double the number of possible mounting configurations.
_________________
78 924 NA
5-lug |
|
| Back to top |
|
|
ideola
Joined: 01 Oct 2004
Posts: 15548
Location: Spring Lake MI
|
| Posted: Wed Dec 19, 2012 11:33 am Post subject: |
|
|
Finally got these plated (yellow cad):
Also now added to the storefront. $38 + shipping for the trigger wheel.
I now have the water pump pulley spacers available as well. These will be plated in yellow cad, and added to the website shortly. $17 + shipping for the water pump pulley spacer. These are made of the same material, in the same thickness, and using the same process as the trigger wheels.


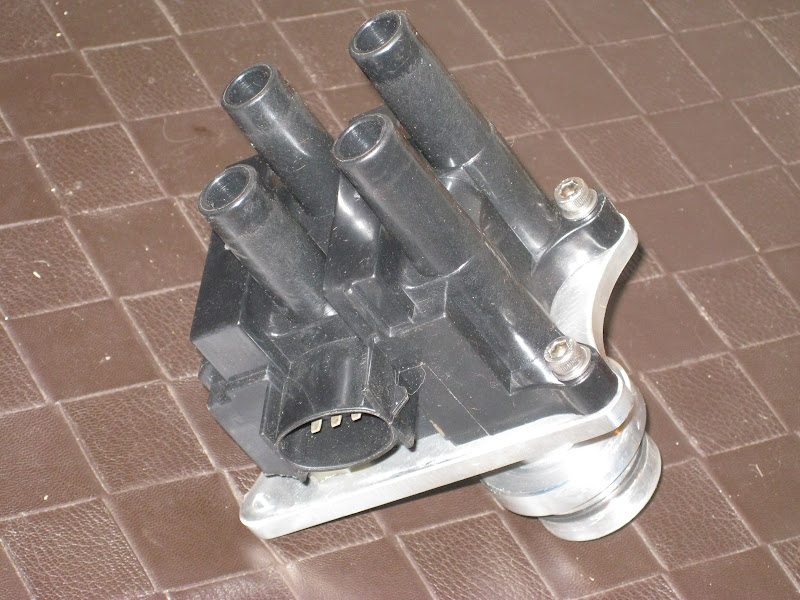
In addition, I now also have a solution for blocking off the OEM distributor housing, which can double as a mounting point for a standard EDIS coil pack. Machined from billet aluminum, and includes a sealing o-ring. $97.50 + shipping. These are made-to-order, so please allow 2-3 weeks lead time.

Next up: VR sensor mounting bracket, the rest of the miscellaneous spacers listed above, and most importantly, reviving the pursuit of a supplier for the fuel rail.
_________________
erstwhile owner of just about every 924 variant ever made |
|
| Back to top |
|
|
Fifty50Plus

Joined: 28 Feb 2008
Posts: 1361
Location: Washington DC area
|
| Posted: Wed Dec 19, 2012 1:27 pm Post subject: |
|
|
Now that is just sweet!!!! Wish it were legal for SCCA 
_________________
1979 924 NA race car
1982 924 NA race car - Sold
1982 924 Turbo almost a PoS
1981 924 Turbo a real PoS, new engine
1982 924 Turbo nice body, blown engine
1972 911 E race car - going to Vintage
Various 944s to become IT-S race car |
|
| Back to top |
|
|
Grenadiers
Joined: 20 Feb 2007
Posts: 3222
Location: Nelson, WI & Prescott, AZ
|
| Posted: Wed Dec 19, 2012 1:44 pm Post subject: |
|
|
If there is a possibility of machining the fuel rail to accommodate the head 'breather', I'm in!
_________________
'83 944 Track car.
'88 924S Track car.
'89 944 Turbo
2004 Winnebago Vectra monster RV
2012 Jeep Wrangler
2014 Kia Soul
2001 Ford F350 powerstroke |
|
| Back to top |
|
|
ideola
Joined: 01 Oct 2004
Posts: 15548
Location: Spring Lake MI
|
| Posted: Wed Dec 19, 2012 2:05 pm Post subject: |
|
|
| Grenadiers wrote: | | If there is a possibility of machining the fuel rail to accommodate the head 'breather', I'm in! |
I'm looking at a different approach here. The primary reason being that the OEM rubber elbow for that connect is NLA, so why bother to retain the OEM geometry? In my previous investigation, I couldn't see a way to make the fuel rail and get around the interference with the OEM breather cover / elbow plate do-hickey.
I see no reason that the OEM hole in the head couldn't be tapped/threaded, and then you could use off-the-shelf fittings to come up with an arrangement that would be lower profile than the stock setup. i.e., imagine two 90 degree bends, one going straight up out of the head and another then pointing to the front of the car, the latter having a hose barb fitting. Then you could just use any old heater hose straight length to connect to the OEM metal tube that goes down to the turbo connection. Make sense?
_________________
erstwhile owner of just about every 924 variant ever made |
|
| Back to top |
|
|
WEASEL149

Joined: 19 Aug 2005
Posts: 595
Location: UK, Sheffield
|
| Posted: Thu Dec 20, 2012 2:35 am Post subject: |
|
|
The distributor block-off with coil-pack mount is a nice neat solution for anyone not into DIY'ing - nice one 
_________________
1979 UK 932 |
|
| Back to top |
|
|
WEASEL149
Joined: 19 Aug 2005
Posts: 595
Location: UK, Sheffield
|
| Posted: Thu Dec 20, 2012 2:41 am Post subject: |
|
|
| ideola wrote: | I'm looking at a different approach here. The primary reason being that the OEM rubber elbow for that connect is NLA, so why bother to retain the OEM geometry? In my previous investigation, I couldn't see a way to make the fuel rail and get around the interference with the OEM breather cover / elbow plate do-hickey.
I see no reason that the OEM hole in the head couldn't be tapped/threaded, and then you could use off-the-shelf fittings to come up with an arrangement that would be lower profile than the stock setup. i.e., imagine two 90 degree bends, one going straight up out of the head and another then pointing to the front of the car, the latter having a hose barb fitting. Then you could just use any old heater hose straight length to connect to the OEM metal tube that goes down to the turbo connection. Make sense? |
Yep, I'm in agreement with Dan here. There are a number of ways to deal with it. I like the GTS method where the breather fits to the side of the oil filler neck.
_________________
1979 UK 932 |
|
| Back to top |
|
|
Grenadiers
Joined: 20 Feb 2007
Posts: 3222
Location: Nelson, WI & Prescott, AZ
|
| Posted: Thu Dec 20, 2012 3:24 am Post subject: |
|
|
Yeah, I'm going to remove the block-off plate, and find a brass elbow or something to fit into the hole. Only thing, I don't like have a nut on the inside of the head to hold it in place. Details to follow~!
_________________
'83 944 Track car.
'88 924S Track car.
'89 944 Turbo
2004 Winnebago Vectra monster RV
2012 Jeep Wrangler
2014 Kia Soul
2001 Ford F350 powerstroke |
|
| Back to top |
|
|
flosho
Joined: 01 Jul 2004
Posts: 3155
Location: Eau Claire, Wisconsin
|
| Posted: Mon Dec 24, 2012 4:28 am Post subject: |
|
|
That dist plug with mount, does it work with a standard edis coil.
_________________
[This Space For Rent] |
|
| Back to top |
|
|
|

