| View previous topic :: View next topic |
| Author |
Message |
chuck21401
Joined: 20 Feb 2005
Posts: 532
Location: Annapolis, MD
|
|
| Back to top |
|
 |
Fasteddie313

Joined: 29 Sep 2013
Posts: 2596
Location: MI
|
 Posted: Sun Dec 15, 2019 6:19 am Post subject: Posted: Sun Dec 15, 2019 6:19 am Post subject: |
 |
|
You may be making it much more complicated than you need to..
I guess you can replace those bushings but I left the rod right on the clutch pedal..
Remove resivoir hose and pressure line from master..
Remove 2 nuts from master-firewall (nuts are hard to get back on)..
Pull master out of firewall, insert new master, go under dash and stick the rod back in the master, install nuts and lines..
Done..
I didn't even have to bleed it really.. I just left the bottom bleeder cracked open and let it flow out for like 5 minutes or so, closed it, and the clutch works perfectly..
It was a pretty easy job replacing both clutch cylinders..
_________________
80 Turbo - Slightly Modified |
|
| Back to top |
|
|
chuck21401
Joined: 20 Feb 2005
Posts: 532
Location: Annapolis, MD
|
| Posted: Mon Dec 16, 2019 5:03 am Post subject: |
|
|
| Fasteddie313 wrote: | | You may be making it much more complicated than you need to.. |
Well you are probably right. This time I decided to do more research before diving in. When I replaced the slave cylinder I ignored the line that said "if your slave cylinder is going bad...the master will be next." This will be the forth time that I've pulled the starter in four months. It's not the bad really and somehow I've avoided dropping it on my head.
So the first thing I did was to remove the seat. That was easy enough...just four bolts and I found some change under the seat. I recently bought some seat covers from Only944.com so I will be redoing the seats next. Then the carpet, dashboard, steering wheel....it's a long list.

Pulling the seat was an extra step but you can see a whole lot better.
The pics I found online didn't help me understand what needs to be done to remove the spring clip.
This is a picture of the clutch spring. Not sure if I will replace that bushing. When the spring is decompressed it doesn't look easy to get to the spring clip.

Here is a picture of the clutch pedal arm...the clevis is at the top.

Here is the spring clip that needs to be removed to release the clevis from the clutch pedal arm.

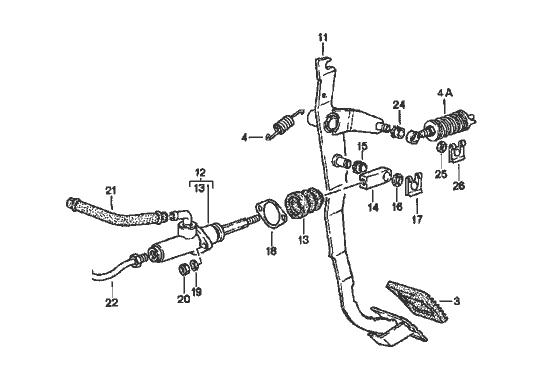
And here is the clutch master cylinder. Doesn't seem like there is much to move out of the way? The instructions for replacement in the 944 mention a bunch of things that need to be disconnected...doesn't seem to apply here.

_________________
1981 Porsche 931 w/S1 engine & g31 transmission. Water-cooled intercooler |
|
| Back to top |
|
|
peterld
Joined: 10 Dec 2006
Posts: 947
Location: Noosa Heads QLD Australia
|
| Posted: Mon Dec 16, 2019 4:40 pm Post subject: |
|
|
Petty much like Eddie said. A good power bleed does help.
With the seat out it will allow to lie on your back with a torch in your mouth, to get to those pesky circlips. 
_________________
80/81 932/8 ROW |
|
| Back to top |
|
|
chuck21401
Joined: 20 Feb 2005
Posts: 532
Location: Annapolis, MD
|
| Posted: Sat Dec 28, 2019 2:16 pm Post subject: |
|
|
With the clutch pedal disconnected, the next step was to drain the fluid from the system and replace the MC and hydraulic line. I opened the bleed valve on the slave cylinder. Added some pressure to the top side with the power bleeder to push the fluid through the system so that level in the reservoir would be just below where the supply line connects.
Here is the master cylinder with the supply line disconnected. Draining everything helped prevent the fluid from going everywhere.

Next I disconnected the hard/flex hose which leads to the slave cylinder. Then it gets tricky to remove the nuts and washers that hold the master cylinder to the fire wall. A swivel socket is very helpful along with a rag stuffed under the MC to catch the nut/washer when it finally breaks loose.


Here is the old and new master cylinder with the clevis moved over to the new part. I didn't realize it at the time, but the clevis wasn't adjusted correctly...had to readjust it once it was back in the car.

This was the most annoying part of the job, replacing the hard/flex hose. I wasn't able to break it loose in the car....had to disconnect the hard line from slave and pull the whole thing out.

Tangent: seems to be a lot of room in this area. Might be a good place to mount the water pump for the air to liquid intercooler? Not sure what to attach it to however.
Here is the new MC with the new black (used to be blue) hose for supply line. The instructions for the 944 replacement suggested a much longer hose, this was like 8" - 9" at the most so I have leftover hose.

Installed...getting the washer on the stud and starting the nut was a bit annoying. I put some putty in the socket to hold nut in there to get it started.

The power bleeder worked great. The clutch pedal wasn't quite right so I adjusted the clevis....much better. Eagle eyes might notice the manual boost controller near the charge tube. Running 10psi or so...until the intercooler gets installed....more on that later...

Back on the road. Also installed a set of Cibie Airport 35 fog lights while the car was offline.

_________________
1981 Porsche 931 w/S1 engine & g31 transmission. Water-cooled intercooler |
|
| Back to top |
|
|
|